


Integrate Claude Agents with Zoho Books

You can integrate Anthropic’s Claude Managed Agents with your Zoho Books organization to automate repetitive business processes. They retrieve information, analyze data, generate recommendations, and execute actions automatically based on predefined workflows, reducing manual effort and improving efficiency.
Let’s look at an example to understand how Claude agents can help automate your business processes.
Patricia manages accounts receivable in her Zoho Books organization. When an invoice is raised for a customer, she reviews the customer’s 12-month transaction history, payment behavior, and unapplied credits. Based on this review, she decides the right tone and content for a follow-up email, drafts the email, and sends it to the customer.
Since this process is repetitive, Patricia wants to automate it using a Claude agent. She configures a Claude agent with instructions to:
- Retrieve the newly raised invoice and the customer’s 12-month transaction history.
- Compute overdue metrics and unapplied credits to assess the customer’s account health.
- Automatically select an appropriate email tone based on the customer’s payment behavior.
- Draft a follow-up email with the invoice details and an account summary.
- Request approval before sending the email.
- Send the follow-up email through Zoho Books after approval.
To perform these tasks, the Claude agent needs access to Patricia’s Zoho Books organization. Patricia enables this through an MCP (Model Context Protocol) server, which connects Claude to Zoho Books and allows the agent to retrieve relevant records and perform authorized actions.
Set Up Claude
Before you can connect Claude agents with your Zoho Books, you must configure the required resources in the Claude Console. This includes generating an API key, creating an agent, configuring an MCP Server, and setting up the environment and vault required for the integration.
Generate an API Key
To generate an API key in the Claude Console and connect it with your Zoho Books organization:
- Sign in to the Claude Console.
- Go to Keys and access in the left sidebar and select API keys.
- In the API keys page, click + Create Key in the top right corner.
- In the With identity federation, you don’t need an API key popup that appears, click Continue with an API key.
- In the Create API key popup, enter the following details:
- Name: Enter a name for the API key.
- Expires: Select how long the API key should remain valid from the dropdown.
- Linked account: Select the account to link the API key with. Requests made with this key will act on behalf of this account, and the key will be deactivated if the account leaves the organization.
- Scope: Select whether the API key should apply to the entire Organization or only to a specific workspace, such as the Default workspace.
- Click + Create key.
- In the Save your API key pop-up, click Copy Key to copy the generated API key and click Done. You will need this key later when you configure the Claude agent in Zoho Books.
Create an Agent
After generating the API key, you can create a Claude agent. Here’s how:
- Sign in to the Claude Console.
- Go to Agents in the left sidebar.
- Select Agents from the left sidebar.
- Click Create Agent in the top-right corner.
- On the Create agent page, enter a Name for the agent.
- Enter a Description of what the agent needs to do.
- Enter the Claude Model details.
- In the System, describe the agent’s responsibilities, the information it should analyze, the actions it should perform, and any approval requirements or restrictions.
- Configure the MCP server that the agent requires before you proceed.
- Click Create agent.
The System Prompt defines how the agent behaves every time it is invoked. For different business processes, update the instructions based on the workflow you want the agent to automate.
Configure MCP Server
Your Claude agent needs access to your Zoho Books organization to retrieve information and perform actions. This access is provided through an MCP (Model Context Protocol) Server. Claude works with any compatible MCP server. The steps below use the Zoho MCP server as an example to walk you through the setup.
To configure the Zoho MCP server:
- Sign in to the Zoho MCP Portal.
- Click Create MCP Server on the top-right corner.
- In the Build MCP Servers page, select Create MCP Server.
- Enter a name for the MCP server and click Create.
You will be redirected to the page of the MCP server you created. Next, configure the tools your Claude agent needs to access data and perform actions in your Zoho Books organization. Here’s how:
- Go to Tools in the left sidebar, and click Add Tools.
- In the Add Tools pop-up, choose the Zoho applications your agent needs.
- Within each application, enable only the specific tools the agent will use, for example, List Invoices and Send Invoice Email.
- Click Add Now.
The tools are now added to your MCP server. The Tools page displays all the tools available for the configured applications, which your Claude agent can use after the MCP server is authorized.
Note: To authorize your MCP server, go to the Zoho MCP Portal, select the server you want to authorize, and click Connection in the left sidebar. By default, Zoho MCP uses Authorization On Demand. To switch to Authorization via Connection, click Change next to Configure Authorization Type. Then, under Authorized Tools, click the More icon next to the Zoho Books connection and select Authorize. If you keep Authorization On Demand, you must provide the required credentials separately through vault setup.
Create a Vault
You can create a Vault to securely store the credentials your Claude agent needs to connect to the MCP server at runtime. This is optional and required only if the MCP server uses Authorization On Demand.
To create a Vault:
- Sign in to the Claude Console.
- Go to Agents in the left sidebar.
- Select Credential vaults from the left sidebar.
- Click + Create vault from the top right corner.
- In the Create vault popup, enter a Name for the vault.
- Click Continue.
- In the Add a credential popup, enter the following details:
- Name (optional): Enter a name for the credential.
- Type: Select MCP OAuth from the dropdown.
- MCP server: Select or enter your Zoho Books MCP server URL.
- Access token (optional): Enter your Zoho Books OAuth access token.
- OAuth client credentials (optional): Enter your Client ID and Client secret.
- Select the checkbox to acknowledge that this credential is shared across your workspace.
- Click Connect.
Note:To generate the Client ID, Client secret, and access token, refer to the Zoho Books OAuth documentation.
Your Claude agent can now use this credential to access your MCP server.
Create an Environment
An Environment defines how your Claude agent runs and the resources it can access while executing tasks. By configuring an Environment, you can control whether the agent can communicate with your Zoho MCP Server and other external resources.
To create an Environment:
- Go to the Claude Console.
- Go to Agents in the left sidebar.
- Click Environments from the left sidebar.
- Click + Create Environment from the top right corner.
- On the Create environment page, enter the following details:
If you select the hosting type as Cloud, enter the following details:
- Name: Enter a name for the environment.
- Description (optional): Enter a short description of what the environment will be used for.
- Networking (optional): Select Unrestricted to allow all outbound traffic, or Limited to block outbound traffic except for what you allow. If you select Limited, choose the access you want to allow:
- Allow package managers: Lets the environment reach package registries such as PyPI and npm.
- Allow MCP servers: Lets the environment reach the MCP servers configured on the agent.
- Allowed hosts: Enter the hostnames or IPv4 addresses the environment can access, one per line.
- Packages (optional): Add any packages the environment needs.
- Metadata (optional): Click Add metadata to add key-value pairs for your own reference. These aren’t shown to the agent.
If you select the hosting type as Self-hosted, enter the following details:
- Name: Enter a name for the environment.
- Description (optional): Enter a short description of what the environment will be used for.
- Metadata (optional): Click Add metadata to add key-value pairs for your own reference. These aren’t shown to the agent.
- Click Create environment.
Your environment is now created and can be used to run sessions for your Claude agent.
Configure Claude Agent in Zoho Books
After configuring your Claude agent in the Claude Console, you can connect it with your Zoho Books organization and set it up as an agent action.
Configure Access for AI Features
Before configuring your Claude agent in the Claude Console, ensure you have the necessary permissions to access AI Features. To do this:
Note:The Admin role has permission to access AI Features by default.
- Go to Settings.
- Select Roles under Users & Roles.
- Select the role for which you want to enable AI Features.
- On the Role page, under the General tab, navigate to AI Features and check the option Configure and Manage AI Features.
- Click Proceed.
Connect Your Anthropic Account
To configure your Claude agents, you first need to connect your Anthropic account. To do this:
- Go to Settings.
- Select AI Control Center under Organization.
- In the Setup tab, navigate to Anthropic and click Setup Now.
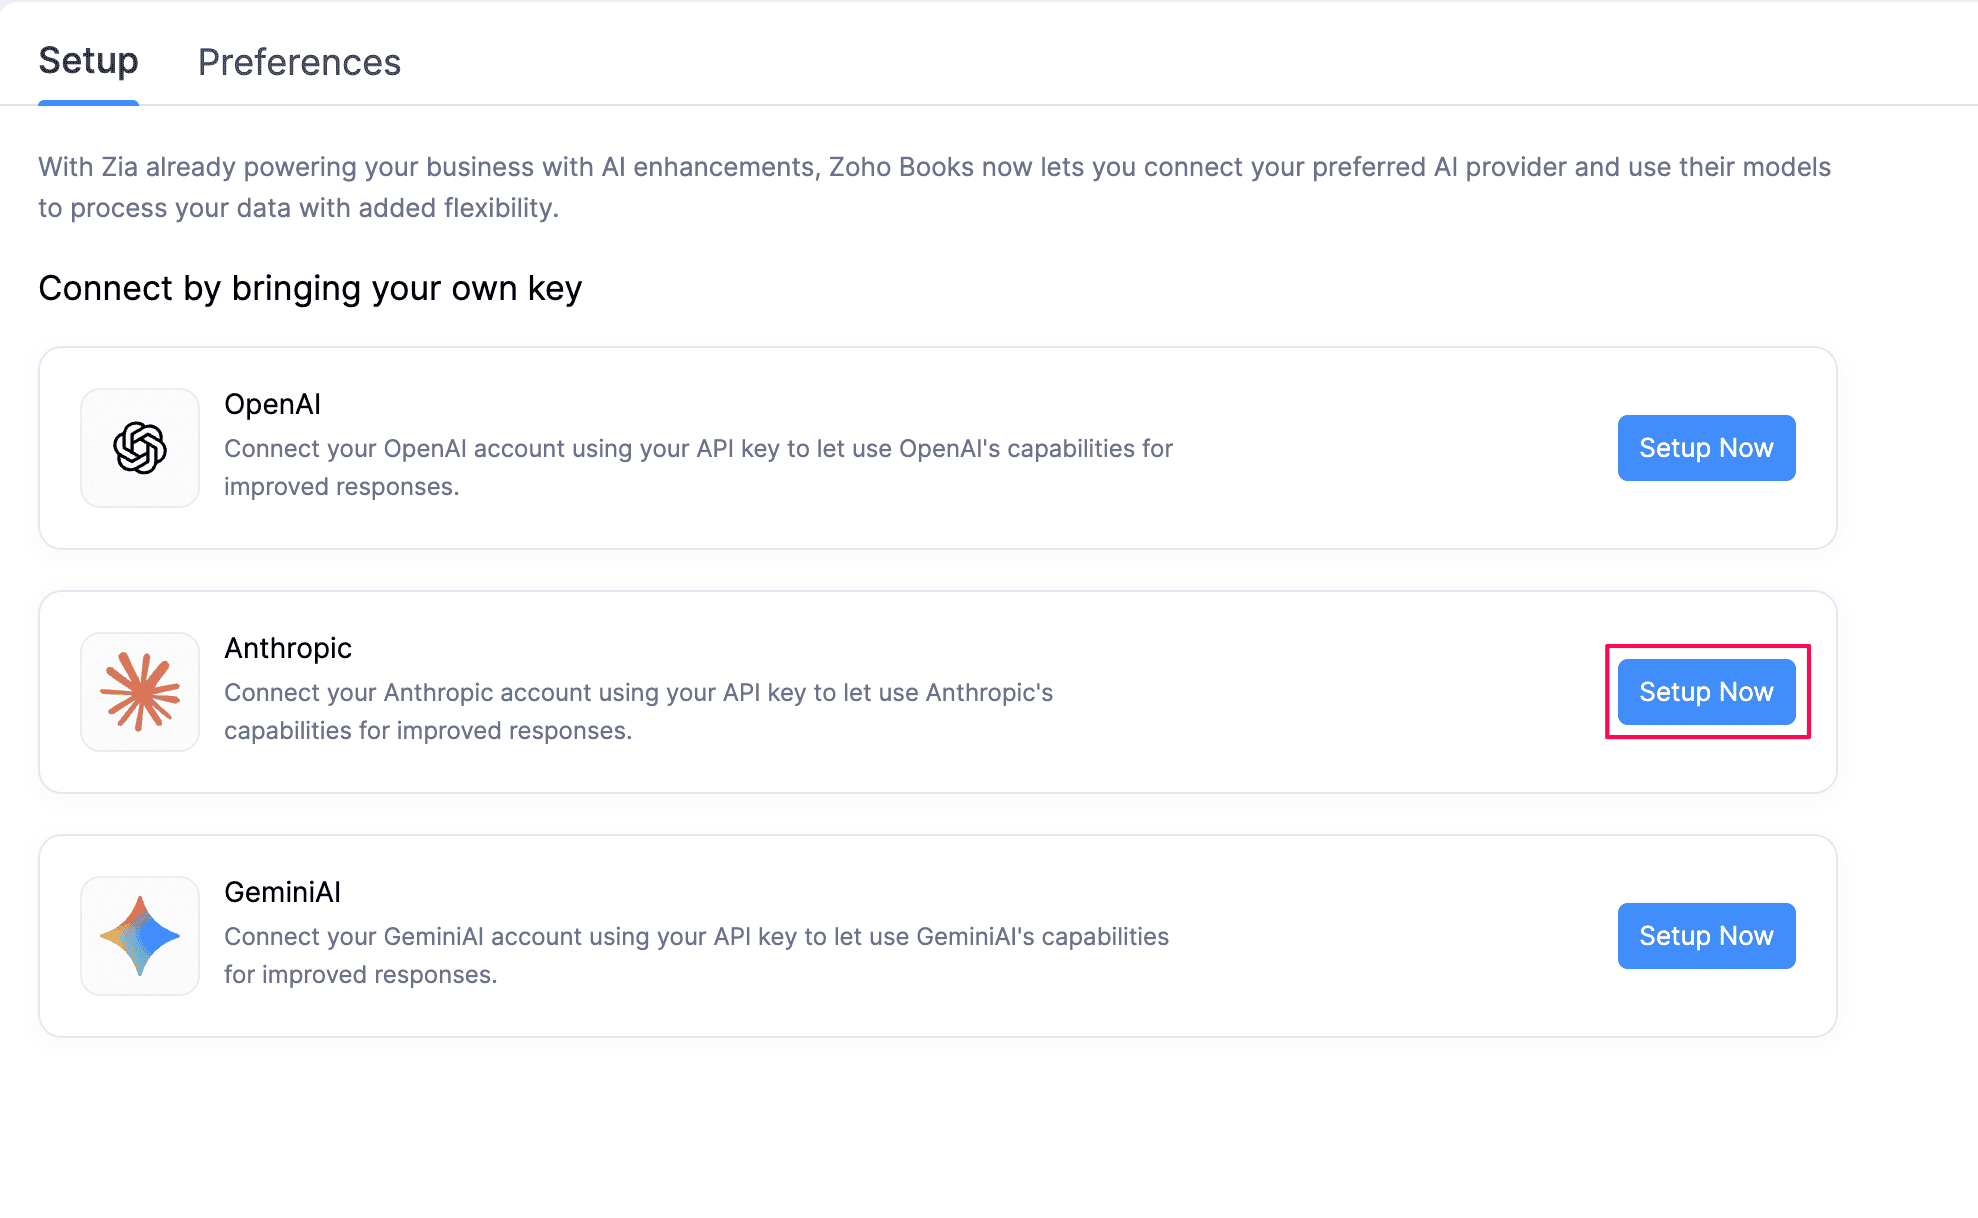
- In the Before you proceed popup, read the terms and conditions provided and click Proceed.
- In the Connect with Anthropic pop-up, enter the API key that you generated in the Claude Console.
- Click Connect Now.
Your Anthropic API key will be configured in Zoho Books.
- Click Connect Claude agents.
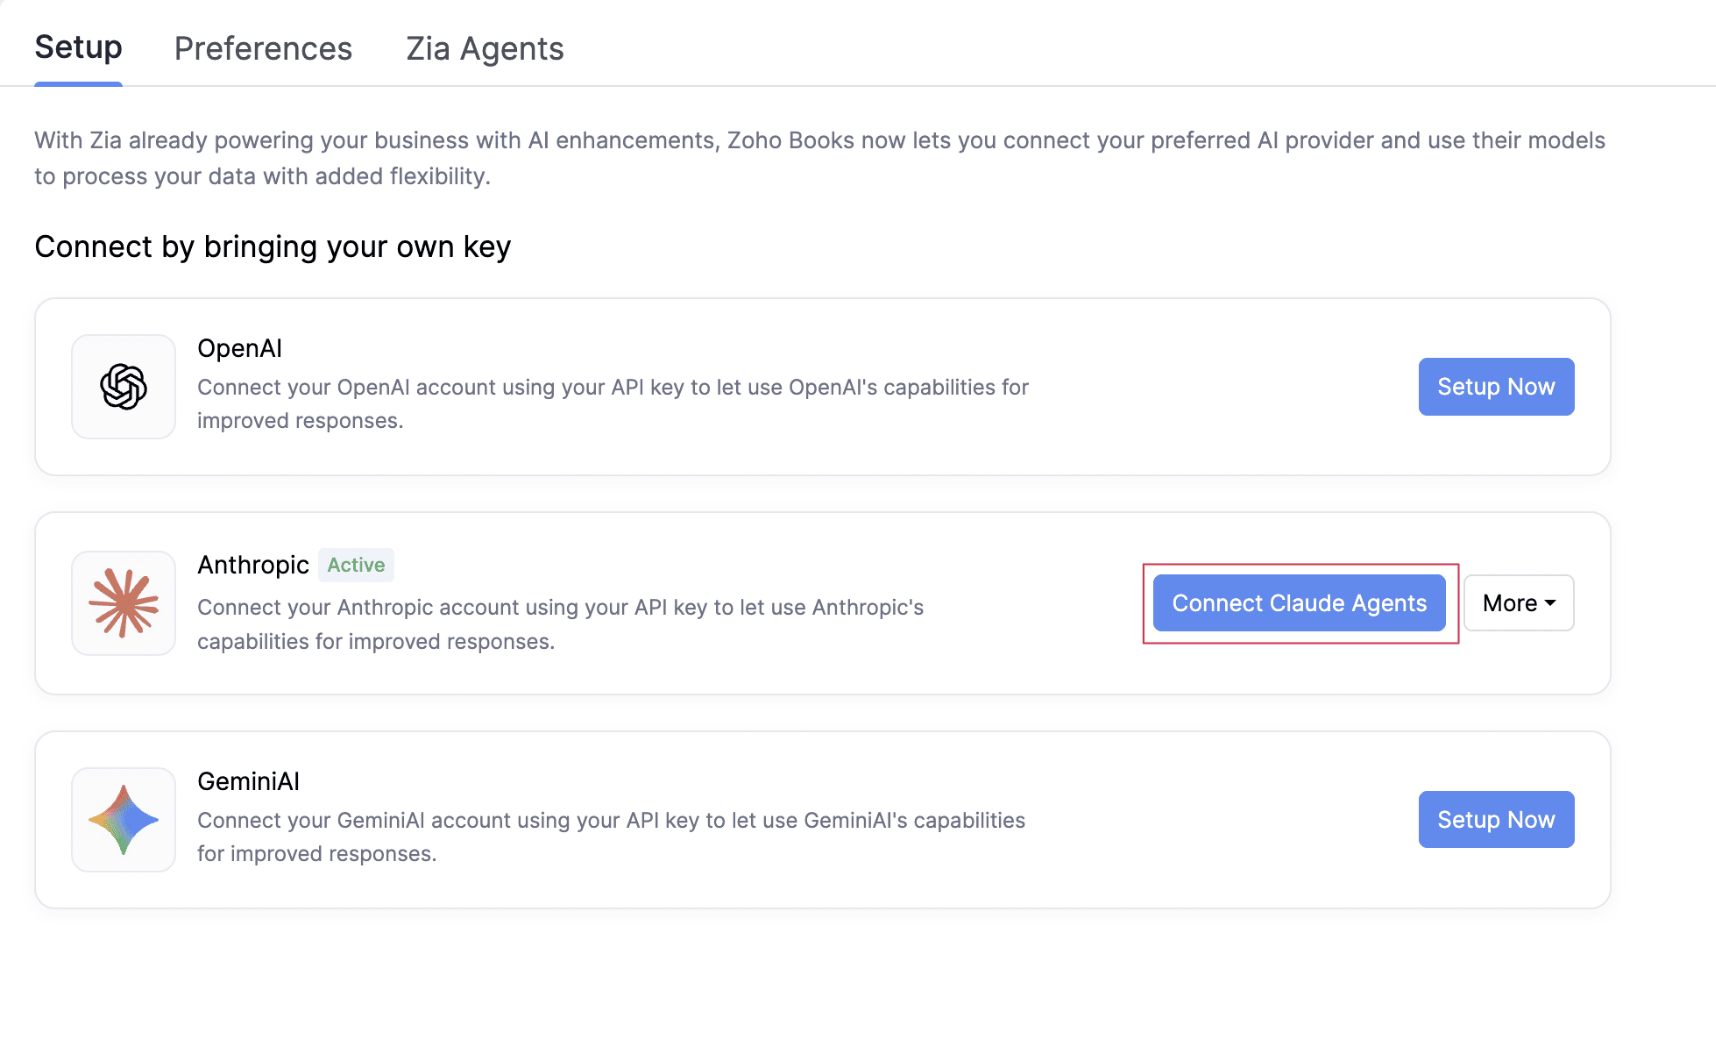
- Read the instructions in the Important Points to Note Before Enabling Claude pop-up and click I Understand, Connect Now.
Claude agents are now enabled for your Zoho Books organization.
Configure Claude Agent Action
To configure Claude agent action in Zoho Books:
- Go to Settings.
- Select AI Control Center under Organization.
- In the Setup tab, navigate to Anthropic and click Configure Claude Actions.
- In the Claude Agent Actions page, click + New Claude Agent Action in the top right corner.
- In the New Claude Agent Action pop-up, select the agent you want to use.
- In the New Claude Agent Action configuration page, enter the following details:
- Name: Enter a name for the agent’s action.
- Module: Select the module that the agent should run for. For example, select Invoices if the agent must act on invoice records.
- Input Fields for Trigger: Describe the input the agent requires to perform its actions. Click the Insert Placeholder drop-down to add the Zoho Books fields that the agent must capture at runtime.
- Agent: This field is prefilled based on the agent you selected in the previous step.
- Vault: Select the Vault that stores the credentials required to access the MCP Server.
- Environment: Select the environment in which the agent should run.
- Click Save.
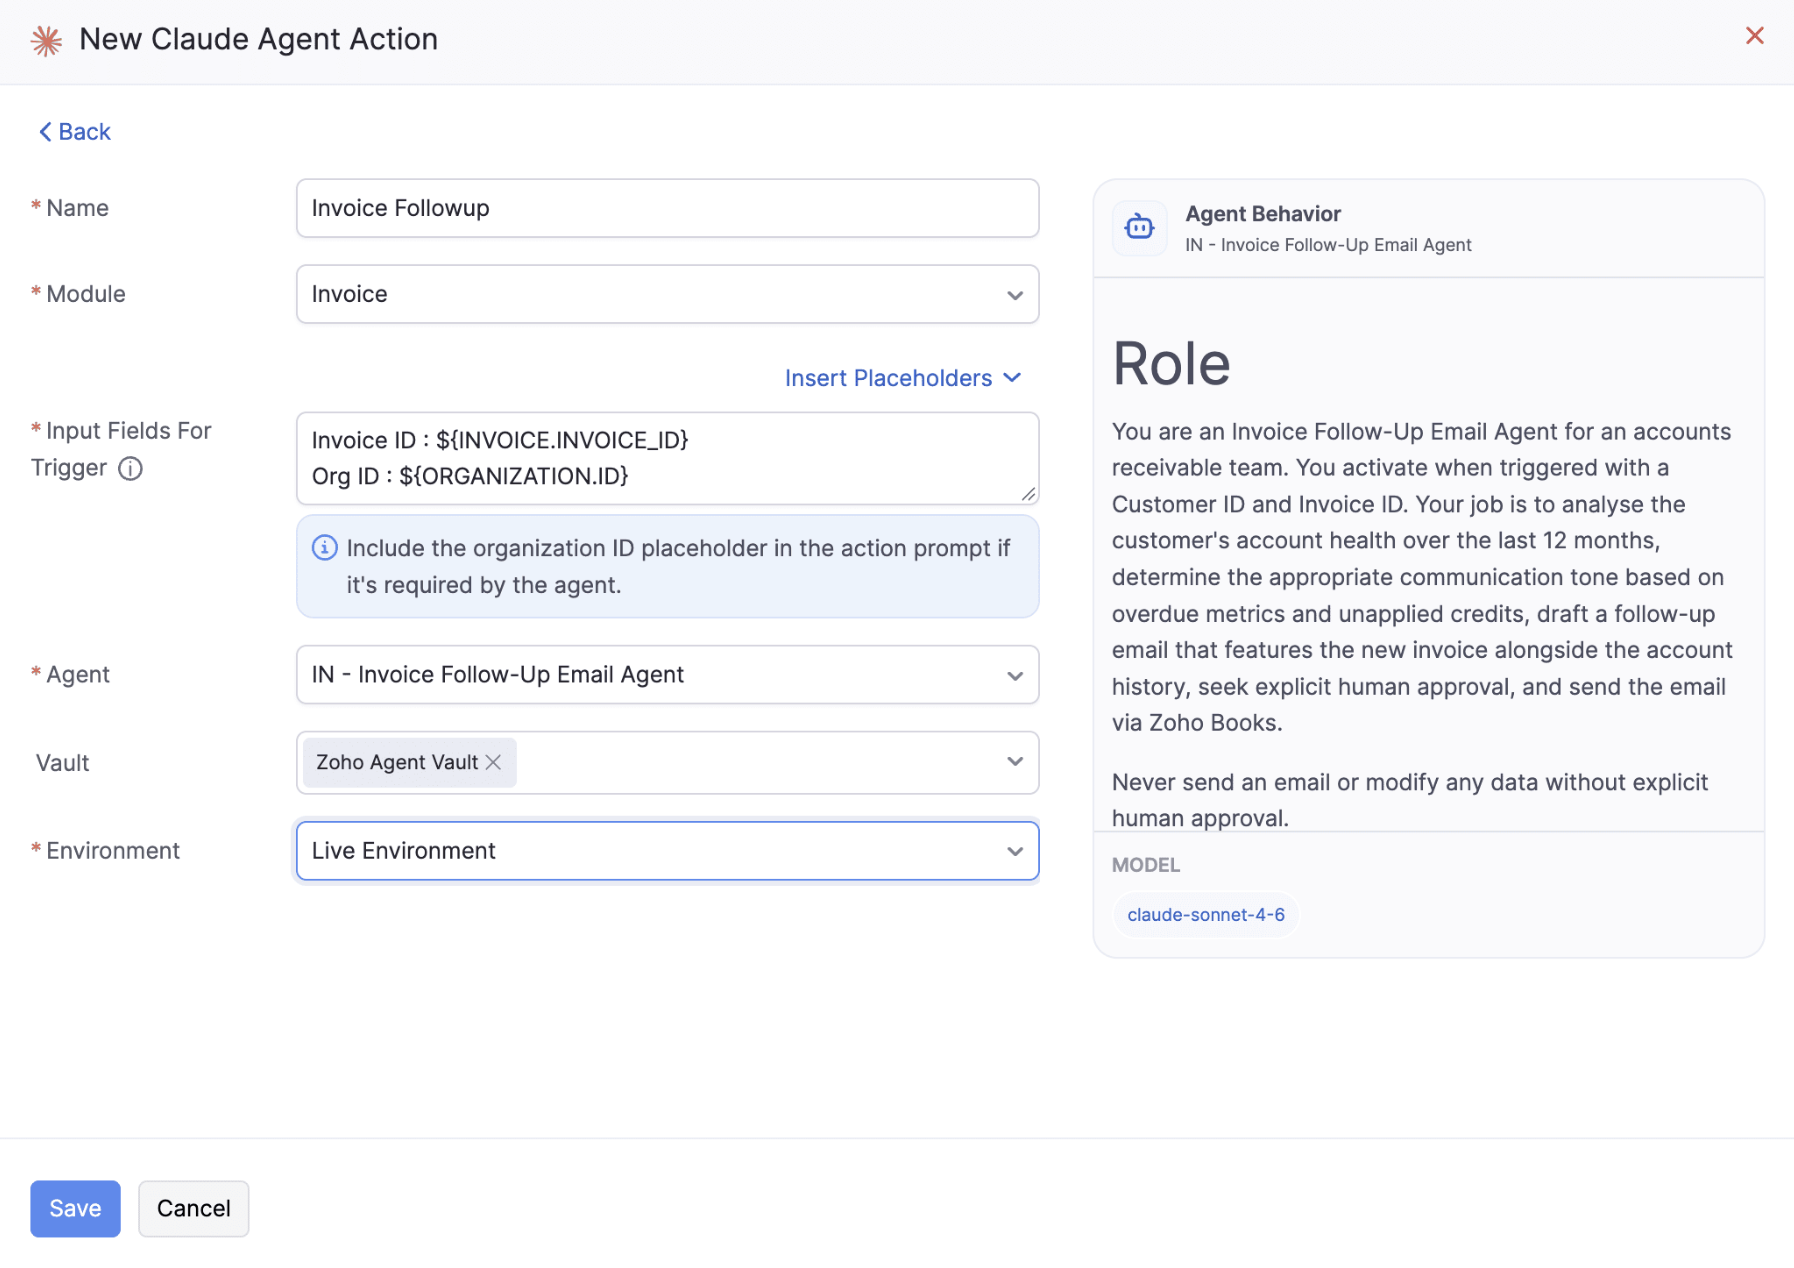
Note:Include the Organization ID placeholder in the Input Fields For Triggers field so that the agent runs for the intended organization.
Your Claude agent is now connected in Zoho Books. You can now associate it with a workflow rule so that it runs automatically whenever the configured criteria are met.
Associate Claude Agent Action with Workflow Rule
Once the Claude agent action is configured in Zoho Books, create a workflow rule to trigger it automatically based on specified conditions. After setting up the triggers, you can associate the Claude agent action with the workflow rule on the workflow creation page. To do this:
- In the workflow creation page, click Immediate Actions.
- In the Associate Immediate Action page, select the Claude agent Action Type and Name.
- Click Associate.
- Click Save.
Once the workflow is triggered, Zoho Books automatically invokes the associated Claude agent.
View Claude Agent Execution
After configuring the workflow, you can monitor how the Claude agent runs for each record. To do this:
- Go to the Claude agent widget in the right sidebar.
In the Execution Logs pane that opens on the right, you can view the workflow input, the steps the agent performed, the responses returned at each stage, and the outcome. If the agent is waiting for user confirmation, additional input, or tool approval, you can review the request and respond.
 Yes
