


SMS Notifications

In Zoho Books, you can send SMS notifications to your customers directly. You can choose between a common SMS sender ID provided by Zoho Books or configure your own DLT-based sender ID to send messages using your company name.
Note:If your organization is already using SMS notifications and is following the old flow, refer to the SMS Notifications help document.
Enable SMS Notifications
To enable SMS notifications in Zoho Books:
- Go to Settings.
- Select SMS Notifications under Customization.
- In the SMS notifications page, Click Enable SMS Integration.
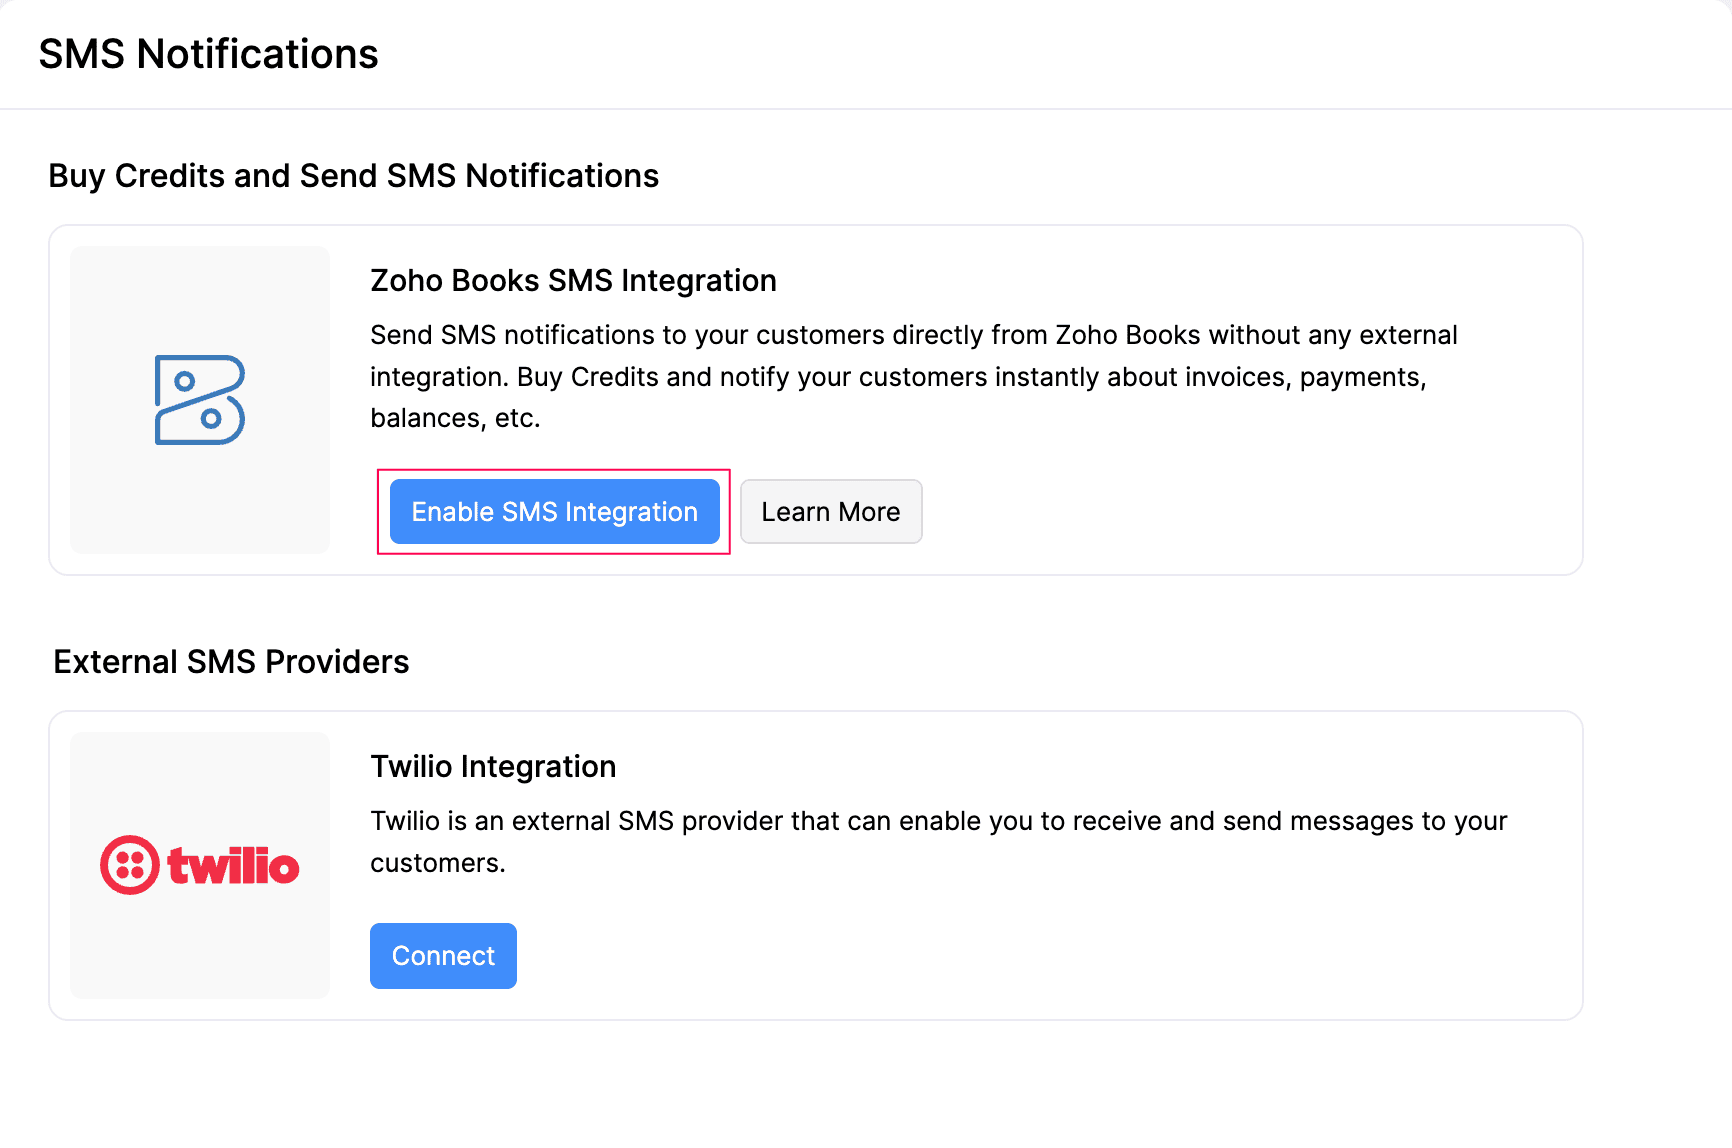
Once you’ve enabled SMS Notifications, you should set up the Sender ID type you want to use. Once the setup is complete, SMS notifications will be enabled for your organization, and you can start configuring your SMS templates.
Setup Sender ID
Zoho Books supports two sender ID options for sending SMS notifications:
Utilize Your Business Sender ID to Send Notification SMS
This option lets you send SMS notifications using your own business Sender ID, so your messages appear to come from your company name or brand.
This option is suitable if you want:
- SMS notifications to appear as coming from your business.
- A branded Sender ID.
- More control over how your SMS notifications are sent.
Prerequisite:You must be registered on a DLT portal to send SMS legally and in compliance with regulations.
DLT Registration
Distributed Ledger Technology (DLT) is a registration system mandated by the Telecom Regulatory Authority of India (TRAI). Businesses must register with a DLT operator before sending SMS to customers. This helps prevent spam and ensures regulatory compliance. You can register for DLT as an enterprise with operators such as Vodafone Idea Ltd, Videocon, BSNL, Jio, Airtel, etc.
To register in the DLT Portal:
- Log in to your preferred DLT operator’s website.
- Select Enterprise.
- Select No if you have not registered with any other DLT operator.
- Enter the required details.
- Upload the documents requested by the DLT operator.
- Click Submit.
You’ll receive an acknowledgement confirming that your details were submitted, followed by an email with your approval status. If your registration is approved, you’ll receive your DLT Registration Number and Sender ID by email.
If your registration is rejected, the DLT operator will email you the reason. Make the necessary changes and register again.
Configure DLT in Zoho Books
- Go to Settings.
- Select SMS Notifications under Customization.
- In the SMS Notifications page, click Configure.
- Under Use your business Sender ID to send notification SMS, click Set Up Now.
- In the pop-up that appears, click Continue.
- In the Enable SMS Notifications page, the Country of Registration, Legal Company Name, and Brand Name fields are pre-filled. Edit them if required.
- Enter the remaining address details such as State/Region, City, Street, and PIN Code and click Next.
- In the Sender ID Info page, enter the following details:
| Field | Description |
|---|---|
| Sender Name (Sender ID/Header) | The unique alphabetic header registered with DLT under TRAI regulations for sending transactional messages. |
| PEID | The unique 19-digit Principal Entity ID from your DLT portal. |
| Entity Name | Your entity name as registered on the DLT portal. |
| Sender Unique ID | The unique Header ID provided by the DLT portal. |
| Chain ID 1 | The Chain ID generated after you add ZOHO CORPORATION PRIVATE LIMITED as your Telemarketer Aggregator. |
| Chain ID 2 | The Chain ID from a second chain entry in which ZOHO CORPORATION PRIVATE LIMITED is also declared as a Telemarketer Aggregator. |
| DLT Portal | The telecom service provider with which your Sender ID is registered. |
- Click Save.
Note:To learn how to create Chain IDs on your DLT operator’s portal, refer this FAQ.
Check Your Sender ID Status
Once you’ve configured your business Sender ID in Zoho Books, it will be sent for verification. You can check its status at any time to see whether it’s ready for use.
To check your Sender ID status:
- Go to Settings.
- Select SMS Notifications under Customization.
- On the SMS Notifications page, click Configure.
- In the Overview tab, click Manage Integration.
- Go to the Sender ID Info tab.
You’ll be able to view the current status of your Sender ID here. Once it’s approved, you can start sending SMS notifications to your customers using your business Sender ID.
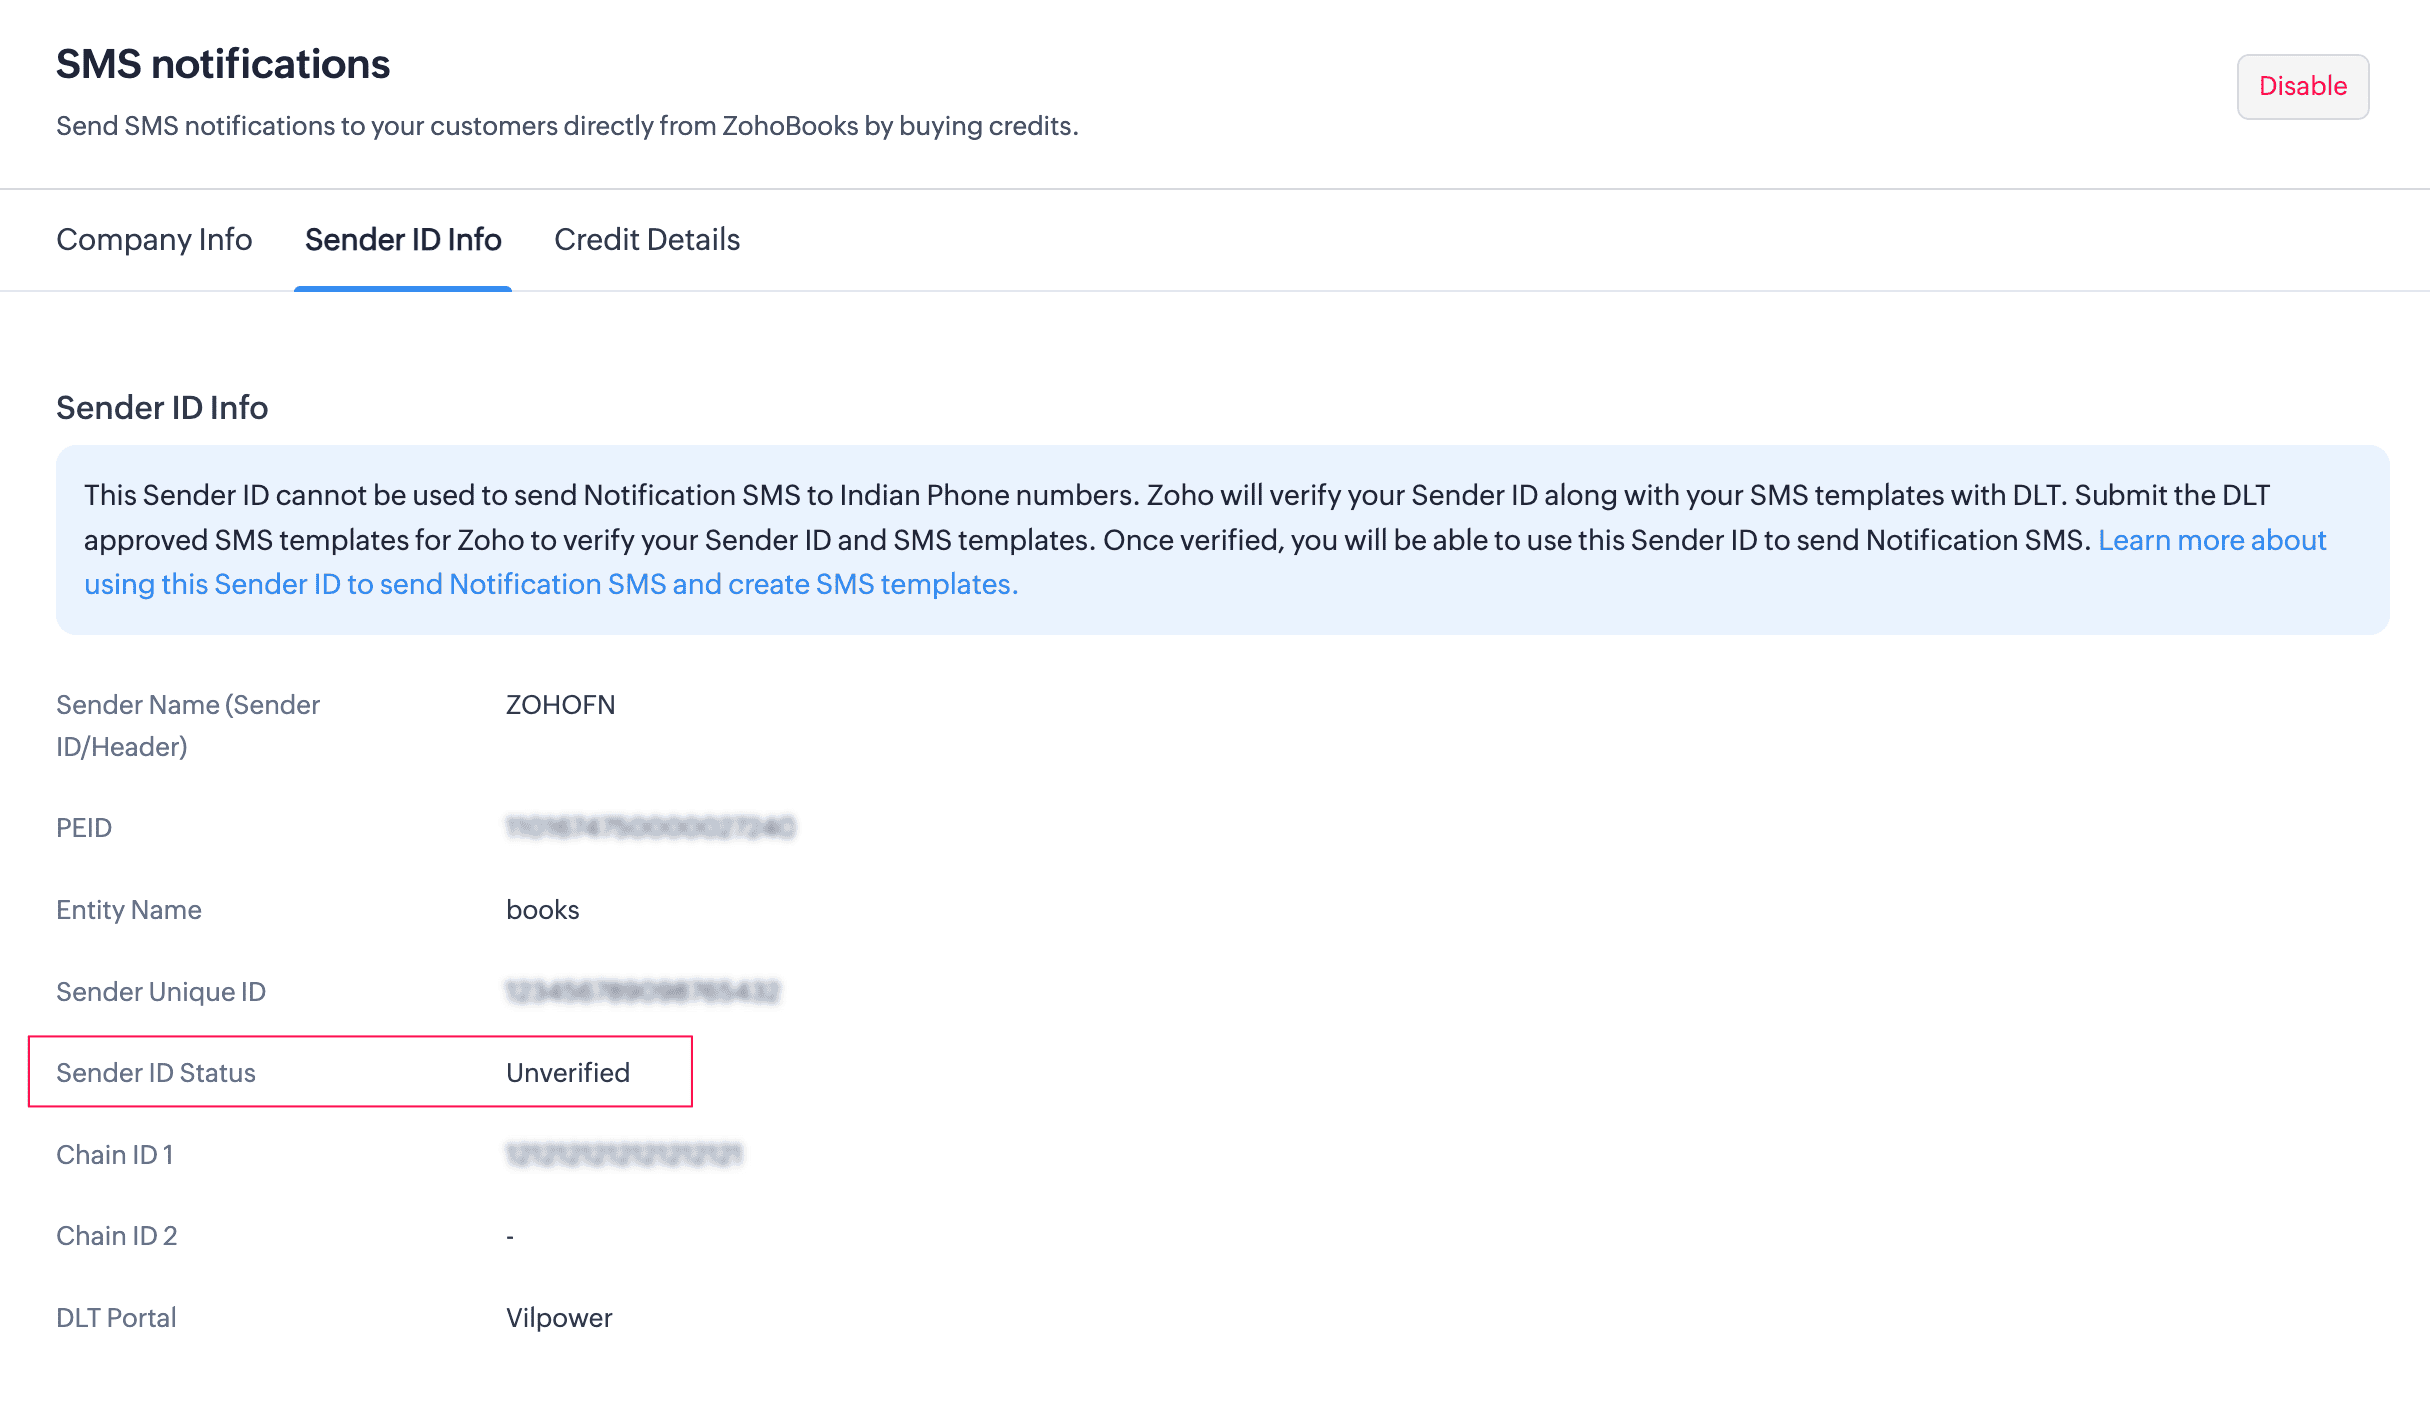
Once you save these details, your business Sender ID will be configured, and SMS notifications will be sent to your customers under your company name or brand.
Utilize Zoho’s Sender ID to Send Notification SMS
This option lets you send SMS notifications using Zoho’s shared Sender ID. It is ideal for businesses that want a quick and simple setup without managing separate sender registration or DLT-related processes.
This option is suitable if:
- You want to start sending SMS quickly.
- You do not have a DLT registration in place.
- You prefer a shared sender ID managed by Zoho.
To send SMS notifications using Zoho’s shared Sender ID:
Go to Settings.
Select SMS Notifications under Customization.
On the SMS Notifications page, click Configure.
Under Utilize Zoho’s Sender ID to send notification SMS, click Set Up Now.
In the pop-up, click Continue.
On the Enable SMS Notifications page, under Brand Info, the Country of Registration, Legal Company Name, Brand Name, and State/Region are auto-populated and it can be edited according to your requirement during setup. Enter the City, Street, and Postal Code/ZIP Code, and click Enable.
Switch to Your Business Sender ID
If you’re currently using Zoho’s Sender ID and want to switch to your own business Sender ID, you can do so without disabling your existing integration.
To switch your current SMS Sender ID to your business Sender ID:
- Go to Settings.
- Select SMS Notifications under Customization.
- On the SMS Notifications page, click Configure.
- In the Overview tab, click Manage Integration.
- On the next page, go to the Preferences tab.
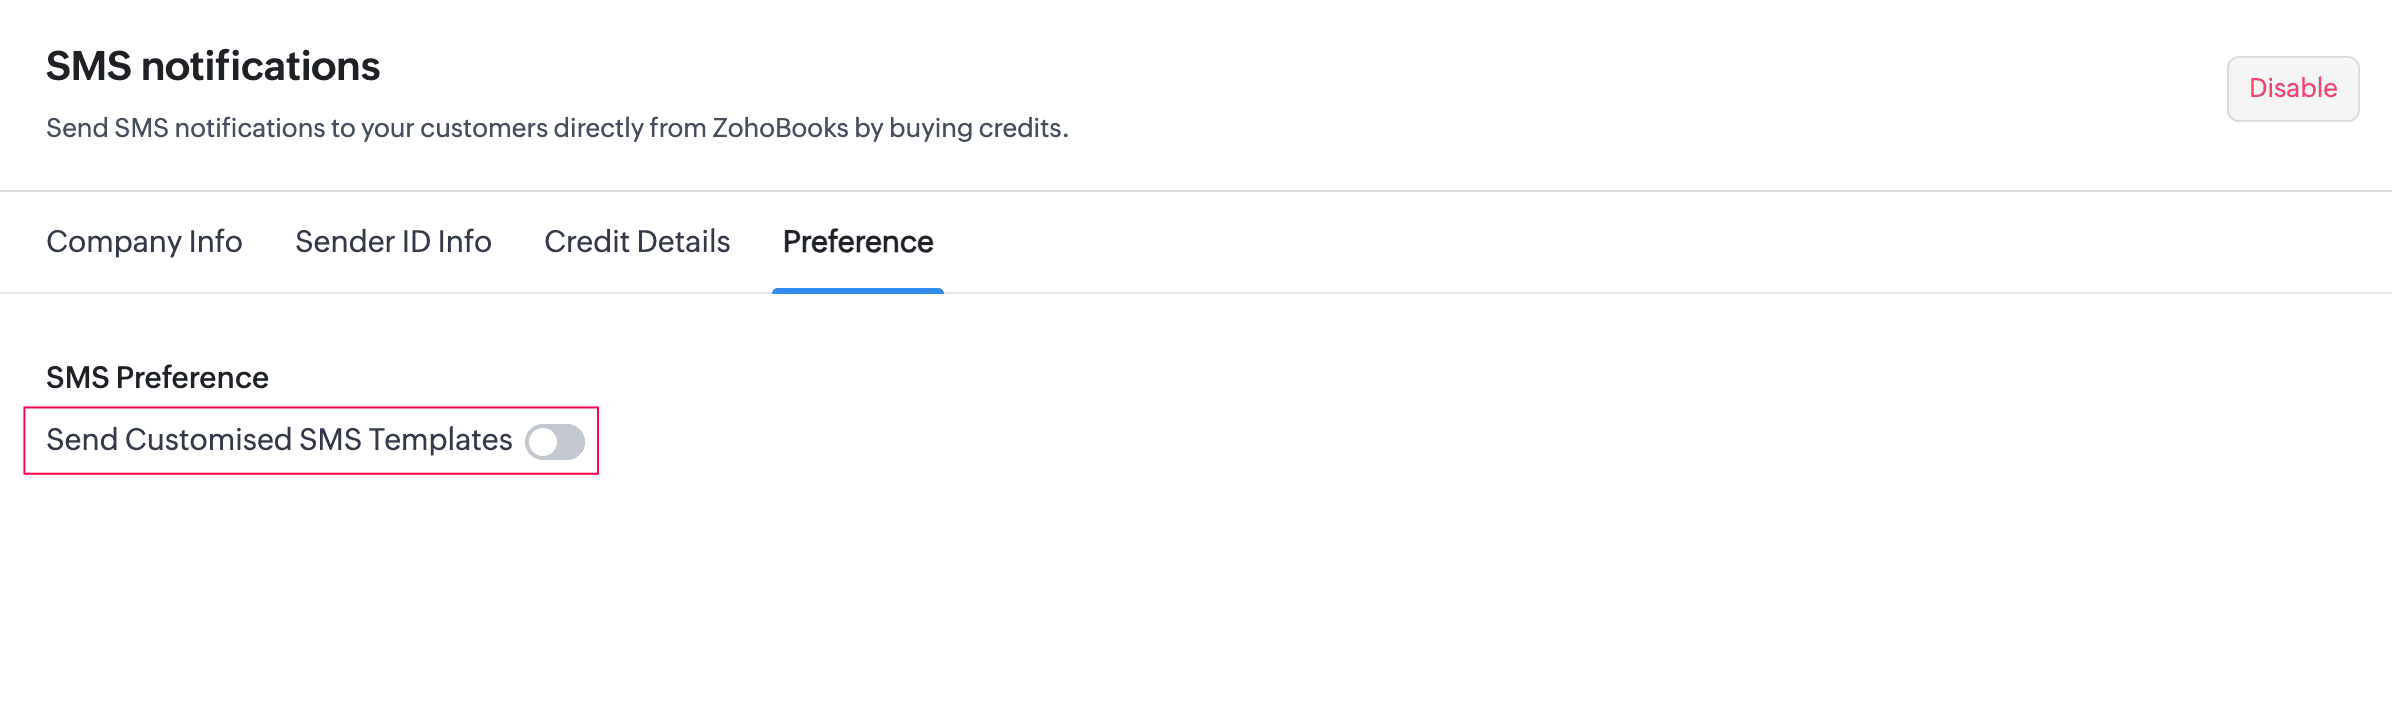
- Enable the Send Customised SMS Templates option.
- In the pop-up that appears, click Add Business Sender ID.
- Enter the required details and click Save.
Your SMS notifications will now be sent using your business Sender ID. Since you didn’t have to disable your existing integration, your credits and SMS history remain unchanged.
Note:You can keep only one active SMS integration at a time. If you disable an integration, the associated templates are removed, but the available credits and the SMS history remain intact and can be used with a new integration.
SMS Template Configuration
After SMS integration is enabled, you can configure templates for the different types of notifications. The steps vary depending on the sender ID type you’ve chosen.
If you’ve chosen to Utilize Zoho’s Sender ID to send notification SMS, follow these steps:
- Go to Settings.
- Select SMS Notifications under Customization.
- On the SMS Notifications page, click Configure.
- Navigate to the SMS Templates tab.
- Select the notification type for which you want to set up a template, and click + Add Template.
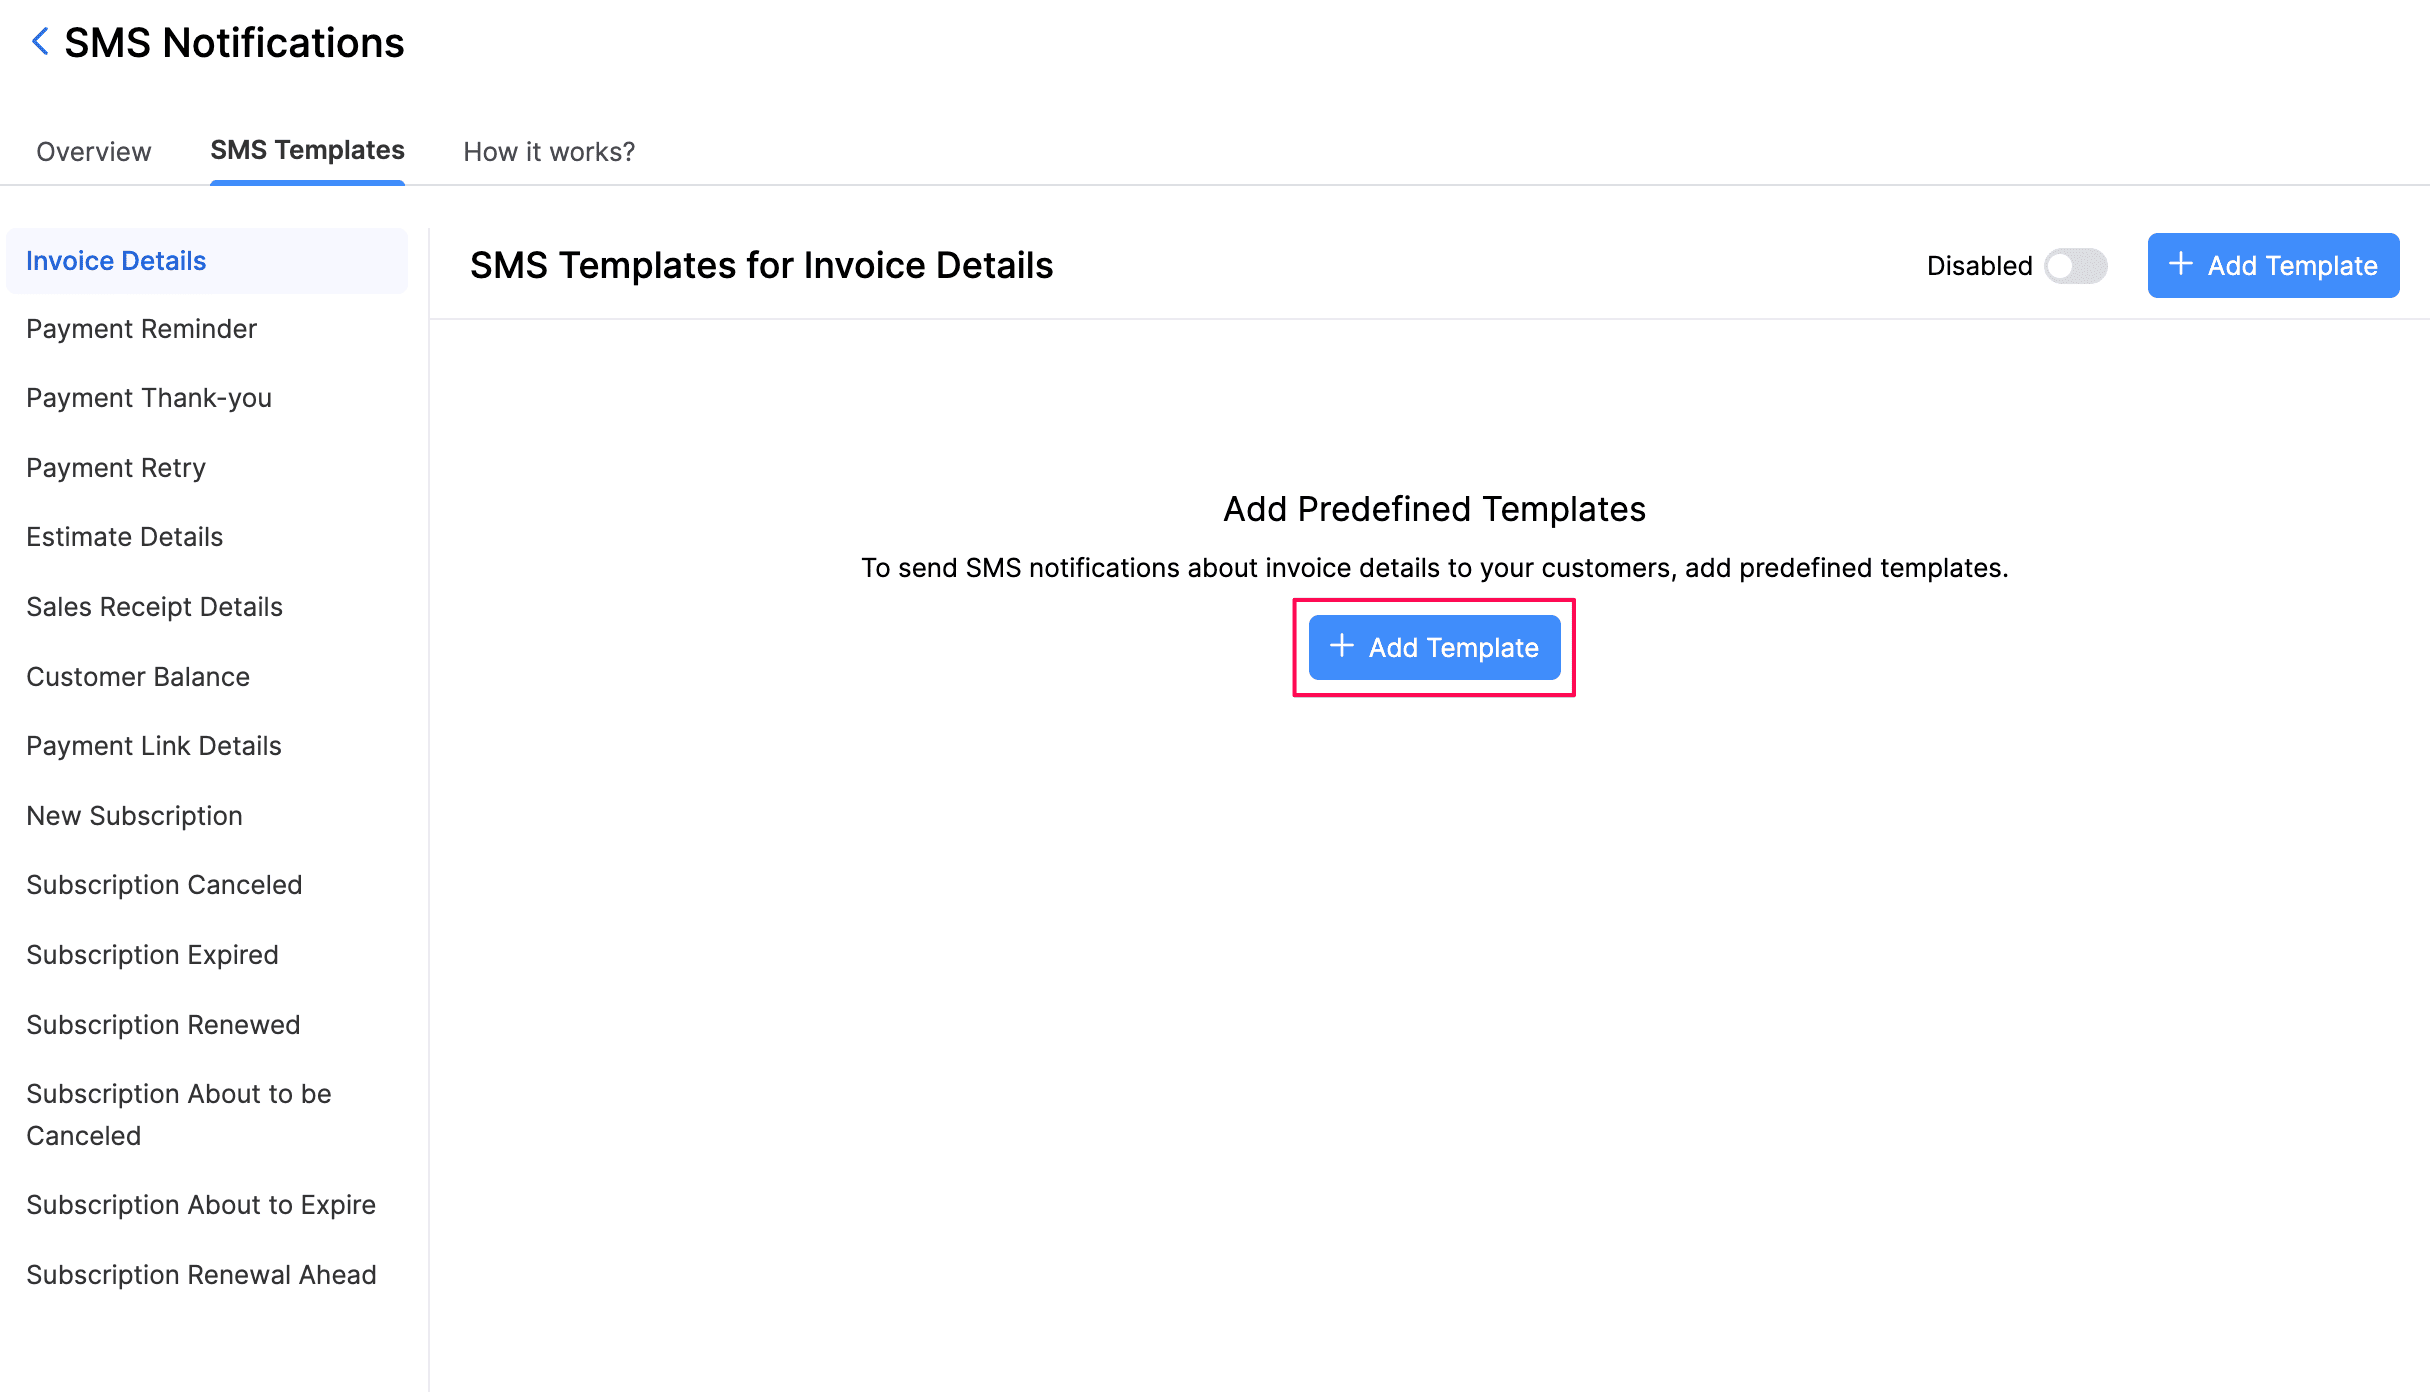
- In the Choose a Template pop-up, select a template from the Template dropdown. The Message for the selected template will be displayed, and you can view how it will appear to your customers in the SMS Preview section. Enter a Template Name.
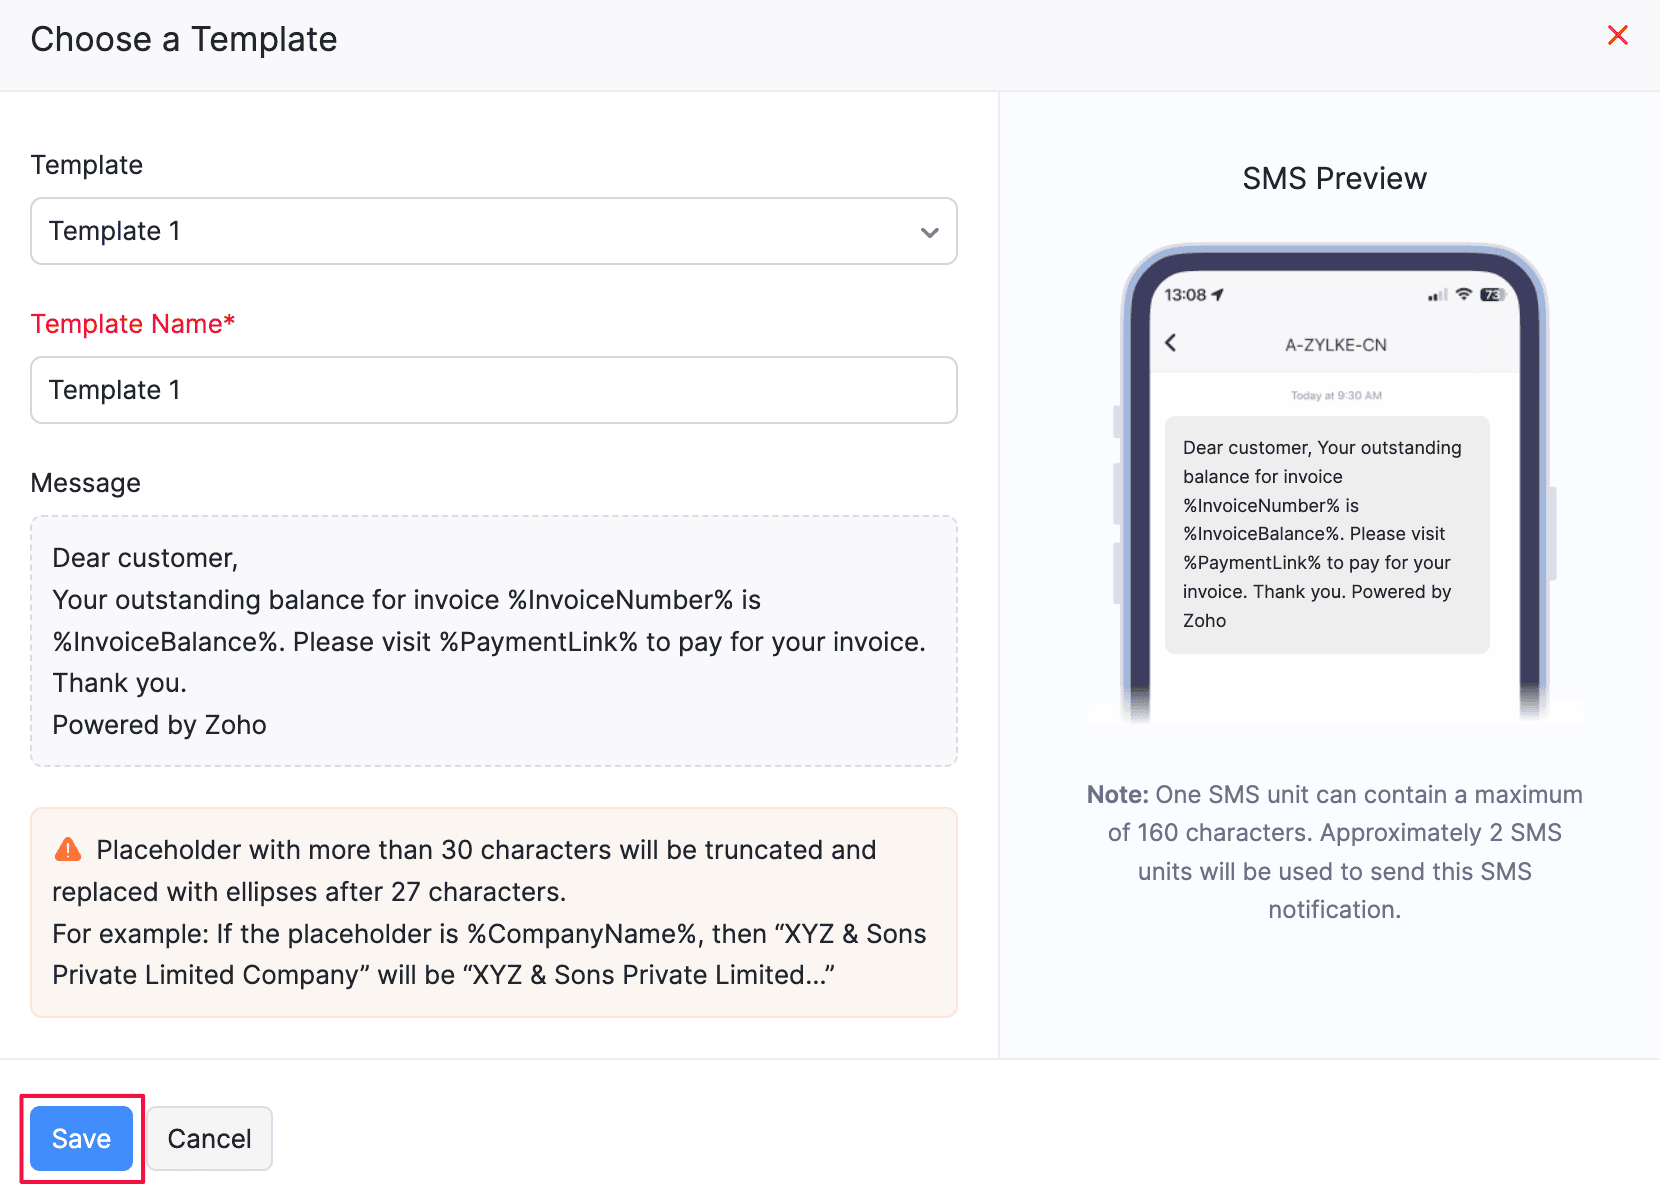
- Click Save.
If you’ve chosen to Utilize your business Sender ID to send notification SMS, you can import your DLT-approved templates. Follow these steps:
- Go to Settings.
- Select SMS Notifications under the Customization section.
- On the SMS Notifications page, click Configure.
- Navigate to the SMS Templates tab, and select Business Templates.
- Select the notification type for which you want to import templates, and click + Import Template.
Note:Import the templates file you downloaded from your DLT portal into Zoho Books. The file must be in CSV format and must not exceed 25 MB.
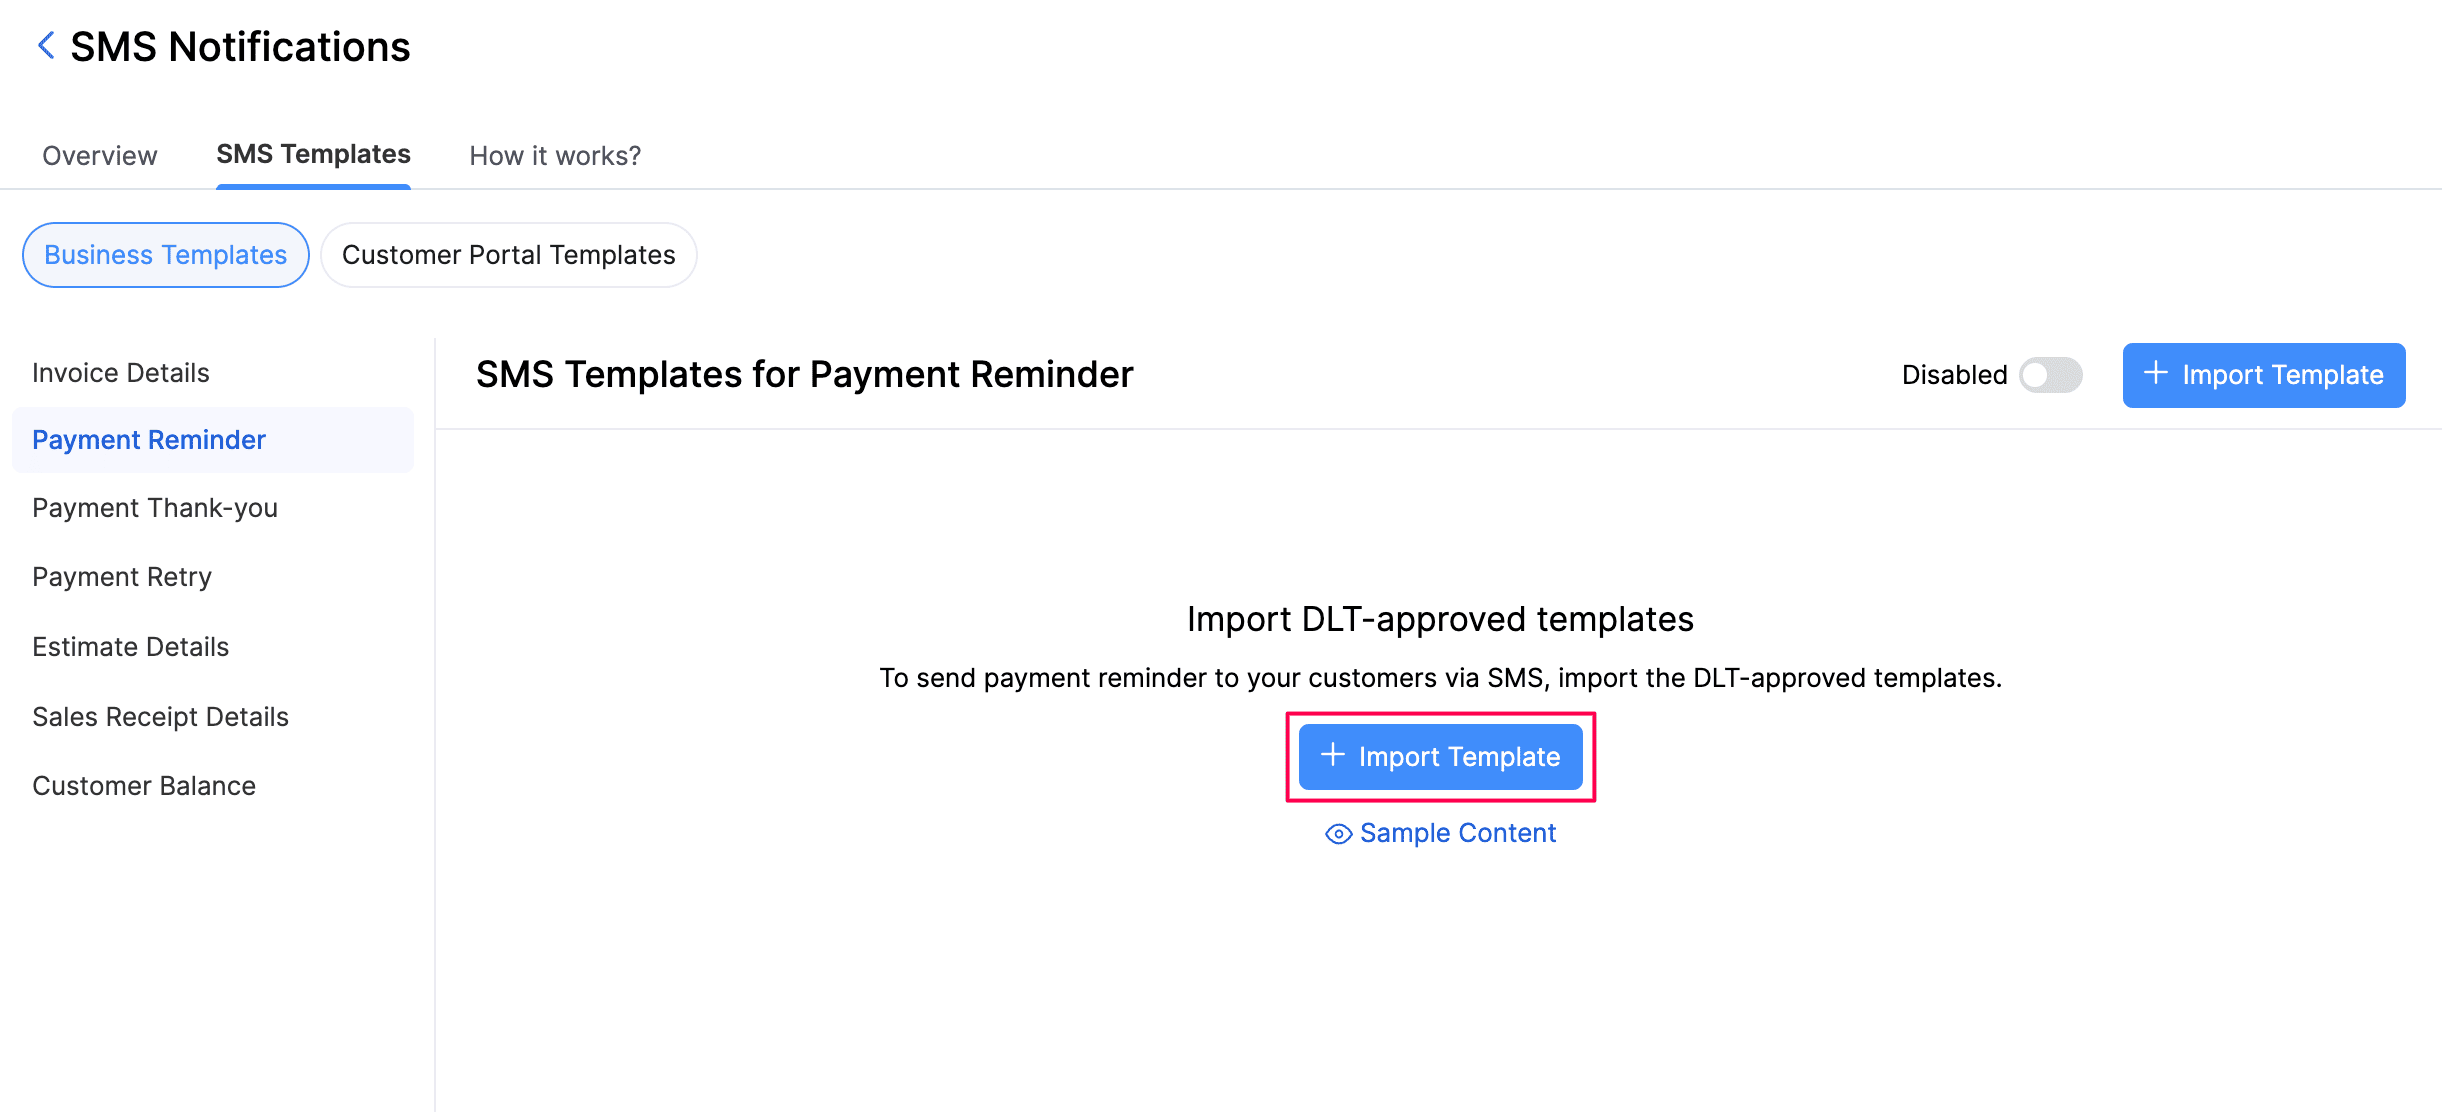
- On the SMS Templates - Select File page, drag and drop your file or click Choose File to upload it.
- Under How would you like to import the templates?, select one of the following options:
- Select All Templates: All templates in the file will be selected for import. You can delete the unwanted ones on the next screen.
- Select Manually: Manually choose which templates you want to import.
- Click Next.
- In the Map Fields page, do the following for each template:
- Select the Template Type from the dropdown. This determines the transaction for which the SMS will be sent.
- Review the Template Name, which is fetched from your file. Edit it if required.
- In the Message field, select the appropriate placeholder from each Select a placeholder dropdown. These placeholders will be replaced with the actual transaction details when the SMS is sent.
- Click the Delete icon next to any template you don’t want to import.
- Click Next.
- In the Preview step, review your templates and click Import.
Manage Credits and Templates
SMS credits are used to send SMS notifications to your customers. You can buy credits, set up auto recharge, view your purchase history, and track how your credits are used from the Credit Details tab.
How Credits Work
| Credit Details | Description |
|---|---|
| Credit value | 1 credit equals 500 SMS units. |
| Messages per credit | Each credit allows you to send up to 500 messages. |
| Cost | Each credit costs ₹86. |
Note:One SMS unit can contain a maximum of 160 characters. Longer messages use more than one SMS unit, so the number of messages you can send per credit depends on the length of your messages.
Note:If your SMS contains emojis, non-Latin characters (such as Hindi or Arabic), or certain accented characters, the character limit is reduced to 70 characters for a single message.
Buy Credits
To buy SMS credits:
- Go to Settings.
- Select SMS Notifications under Customization.
- Click Configure.
- In the Overview tab, click Manage Integration.
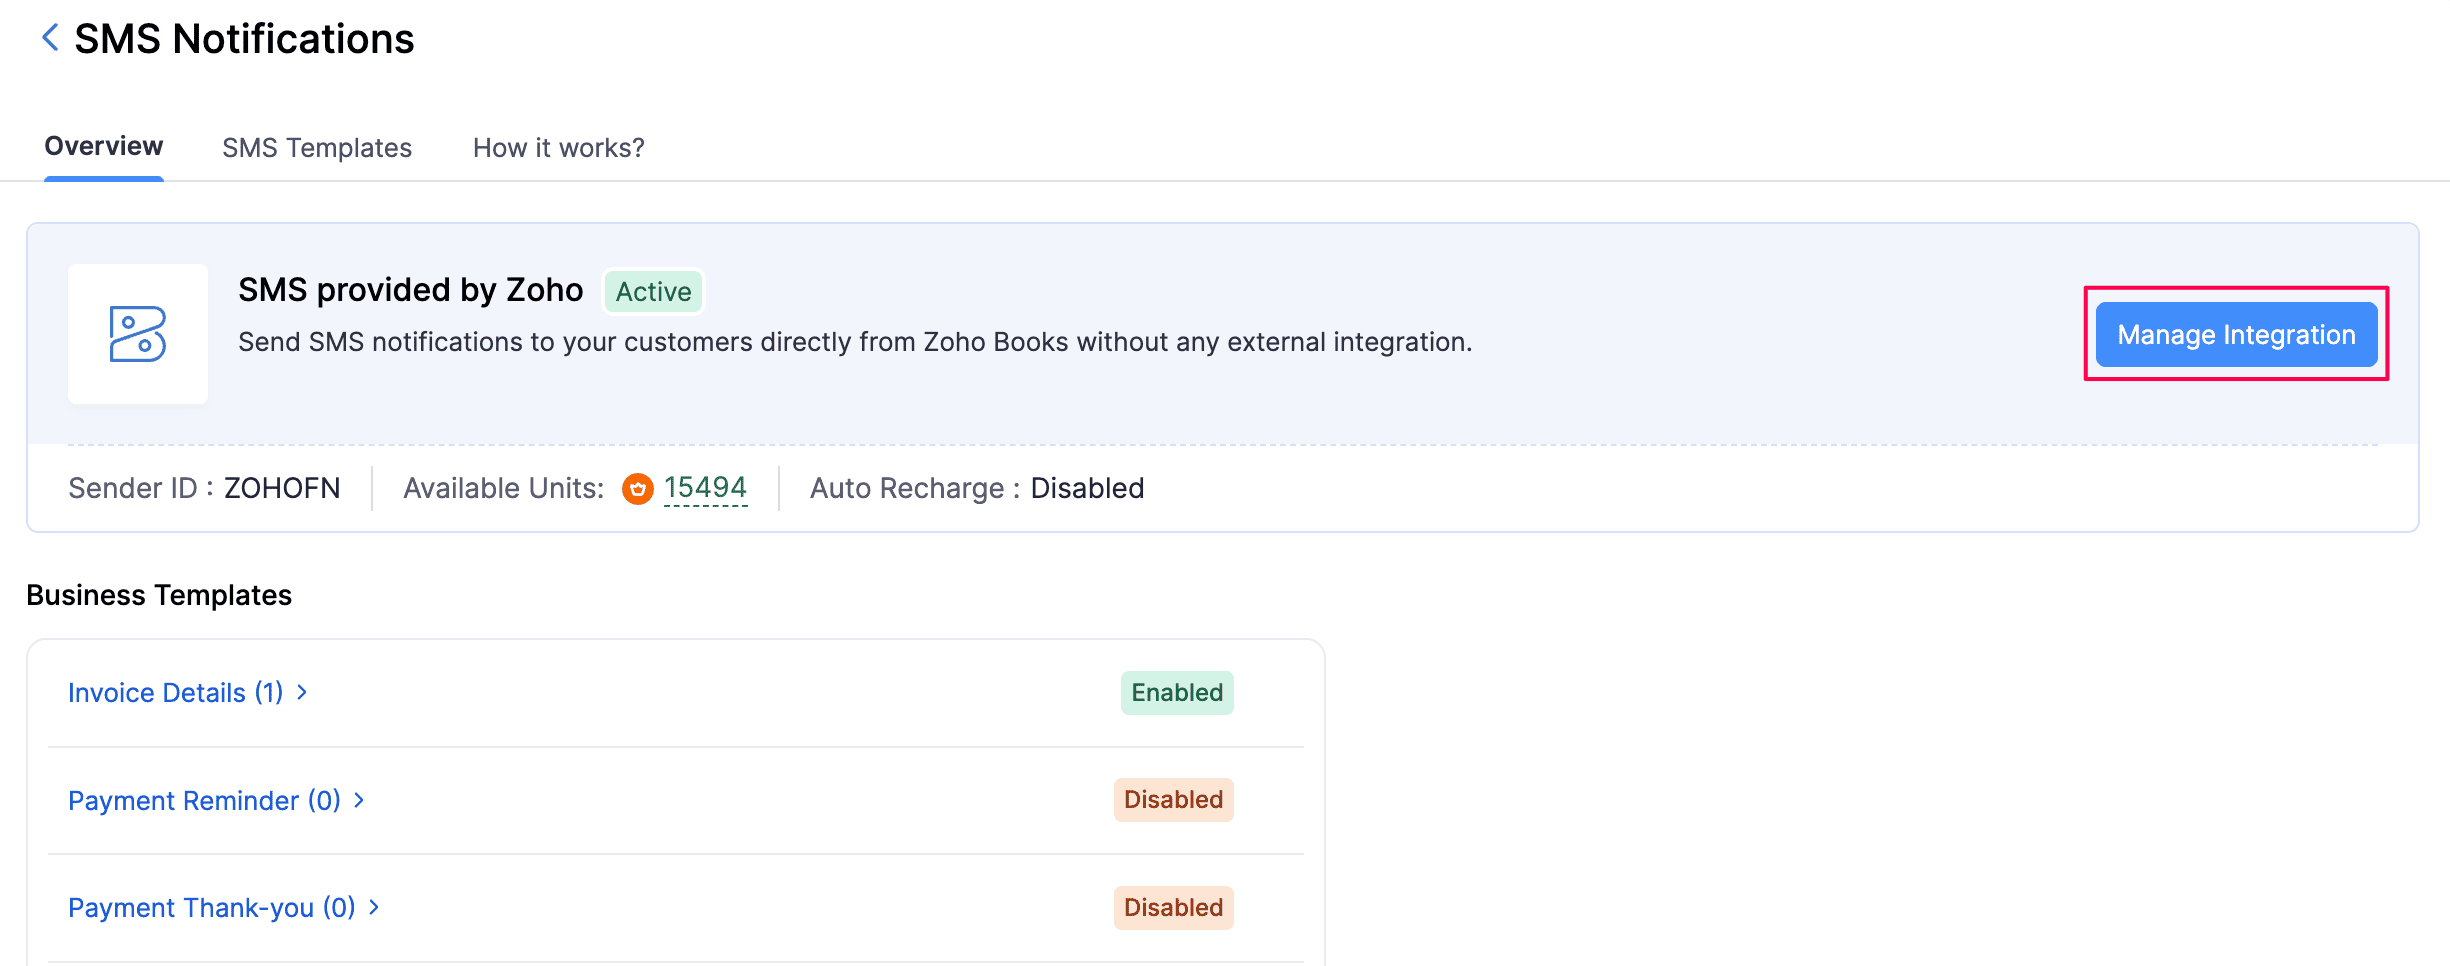
- Navigate to the Credit Details tab.
- Click Buy Credits and follow the on-screen instructions to complete your purchase.
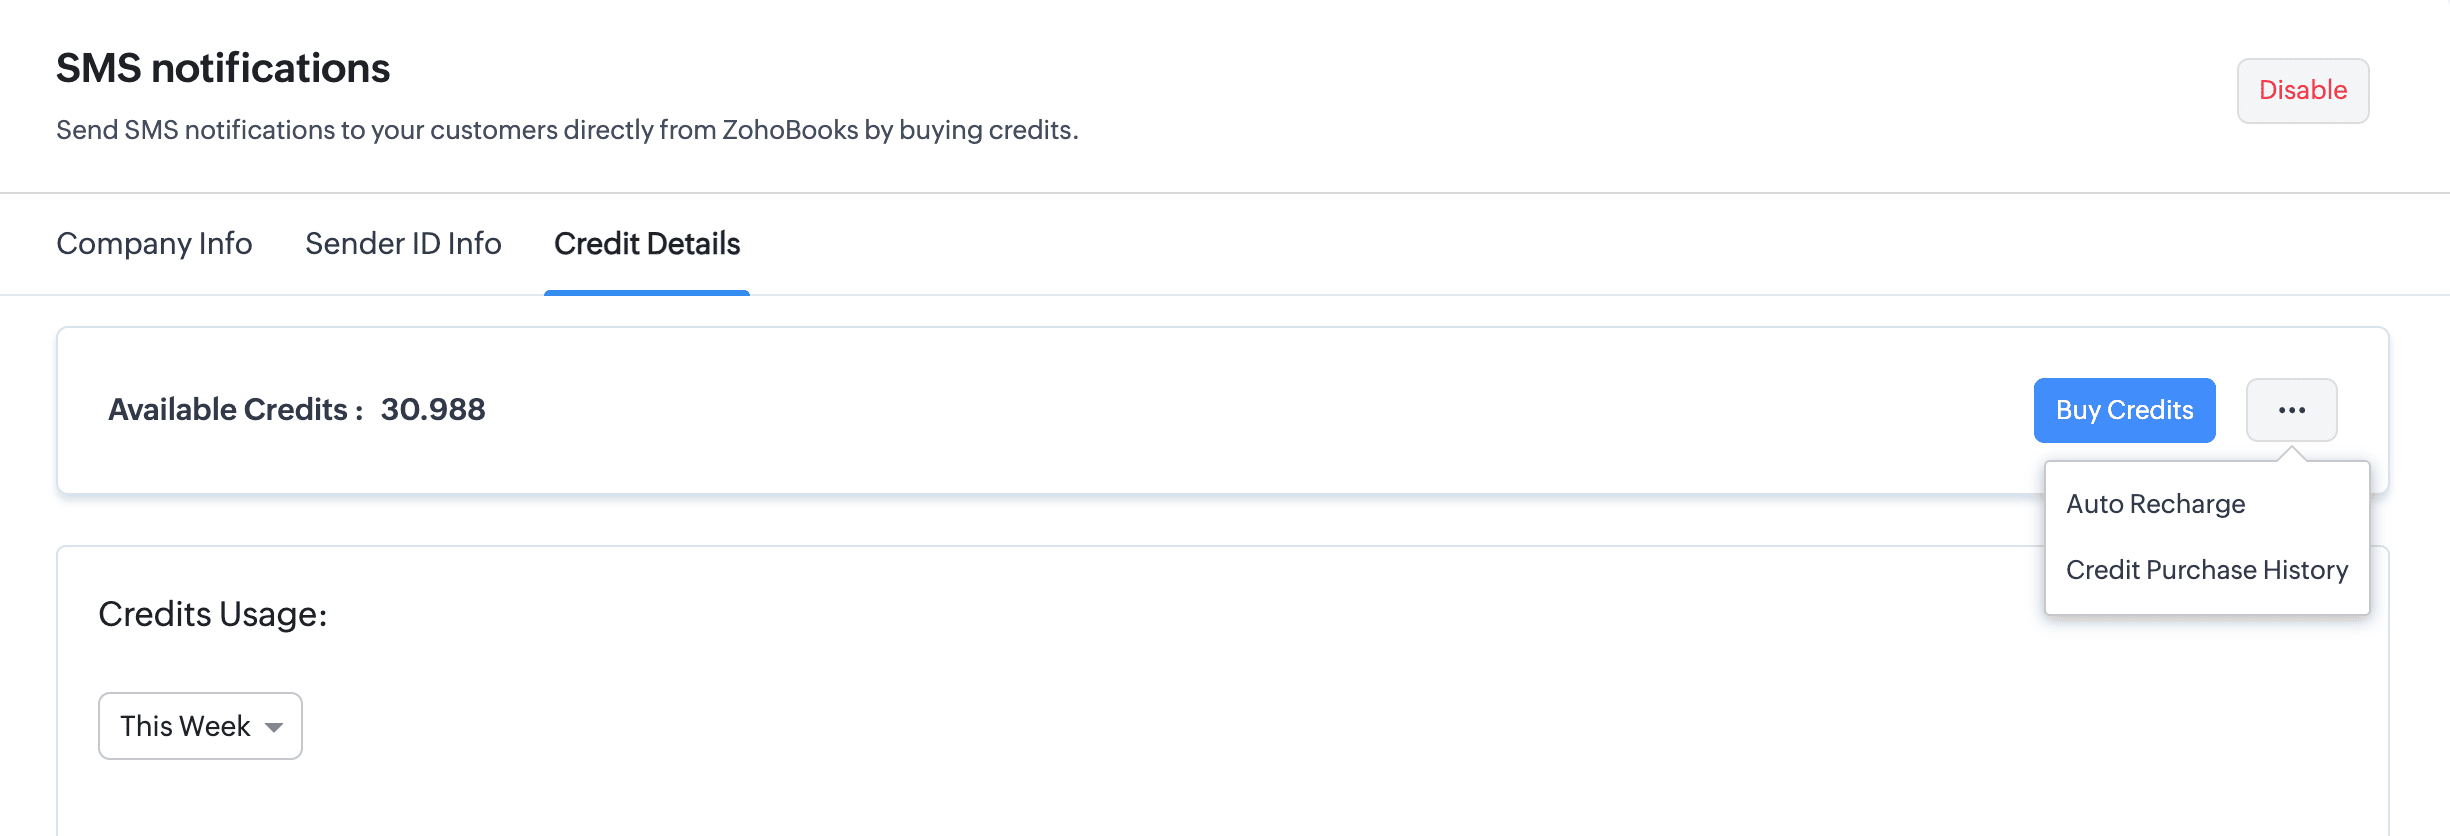
Once purchased, your available units will be displayed in the Overview tab, along with your Sender ID and Auto Recharge status.
| Action | Description |
|---|---|
| Set up auto recharge | To automatically recharge your credits when they run low, click the More icon next to Buy Credits in the Credit Details tab, and select Auto Recharge. |
| View credit purchase history | To view your previous credit purchases, click the More icon next to Buy Credits in the Credit Details tab, and select Credit Purchase History. |
| Track credit usage | In the Credits Usage section of the Credit Details tab, select a time period from the dropdown (for example, This Week) to view the Total credits purchased and Total credits used to send SMS for that period. |
When you reconfigure or disable your SMS integration, the templates linked to it will be deleted. However, your remaining credits and SMS history will be retained.
Enable SMS for Primary Contacts
To enable SMS notifications for a primary contact:
- Go to Sales on the left sidebar and select Customers.
- Select the customer for whom you want to enable SMS notifications.
- In the Overview tab, click the Gear icon in the primary contact section and select Enable SMS Notification.
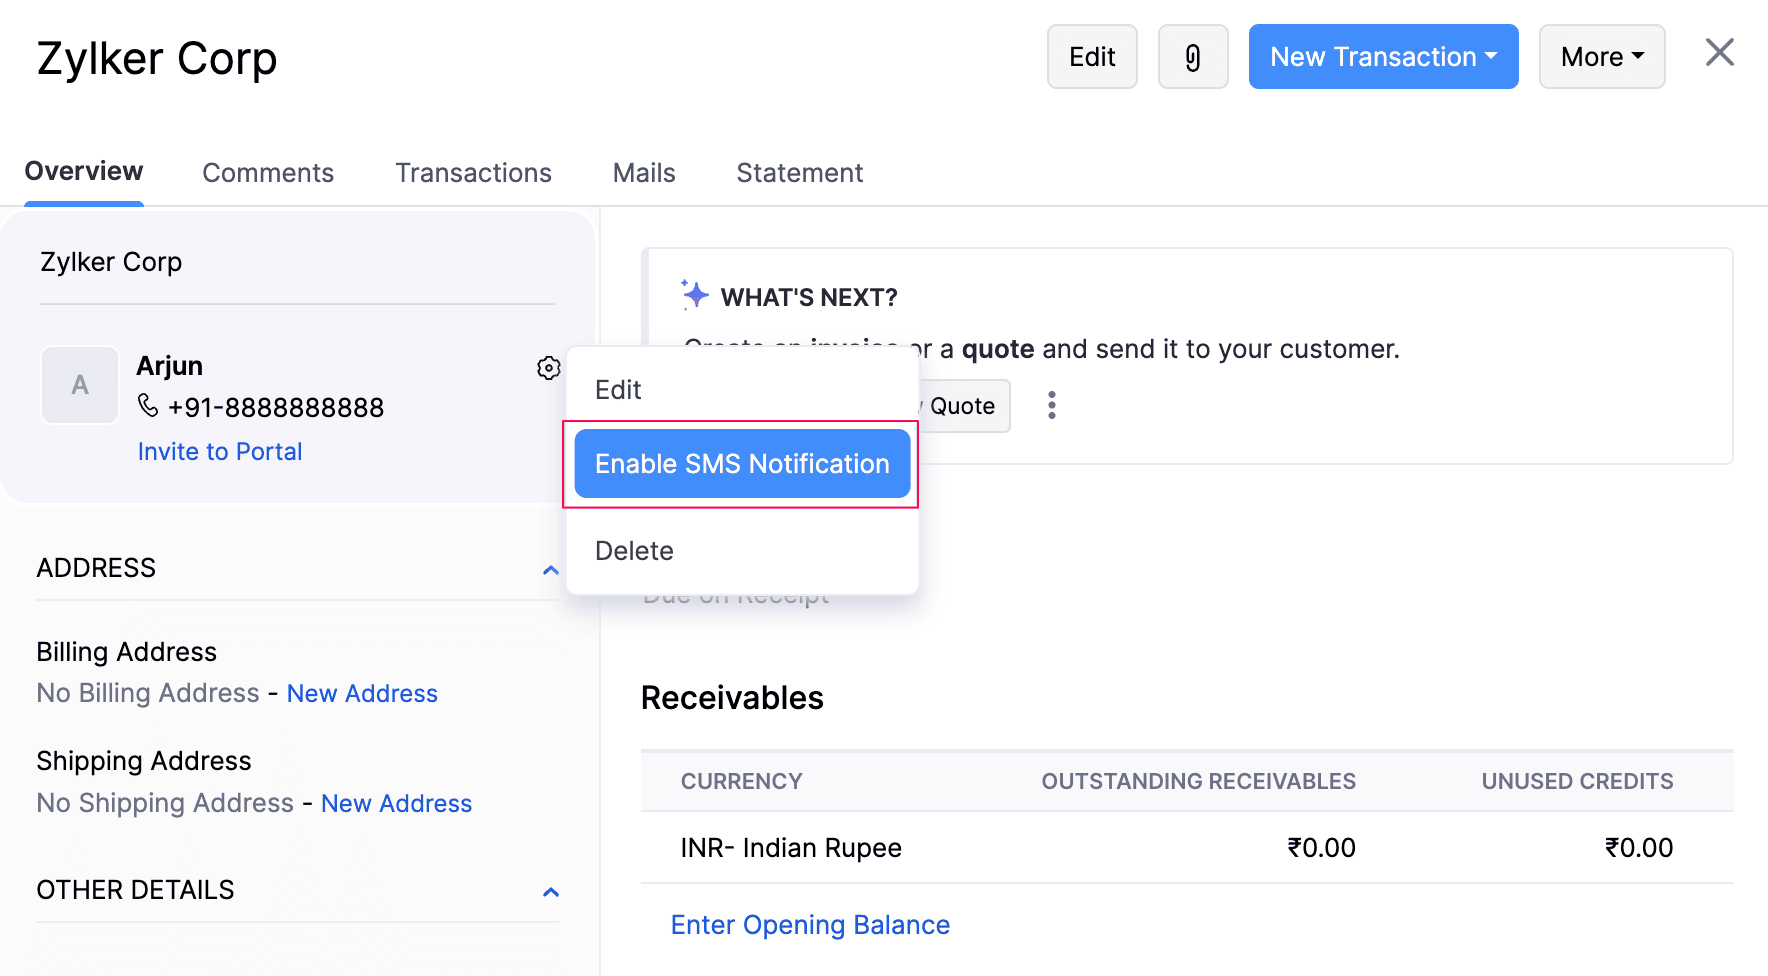
SMS notifications will be enabled for the primary contact.
Enable SMS for Contact Persons
To enable SMS notifications for a contact person:
- Go to Sales on the left sidebar and select Customers.
- Click the customer for whom you want to enable SMS notifications.
- Scroll down to the Contact Persons section and click the Gear icon next to the contact person.
- Select Enable SMS Notification from the dropdown.
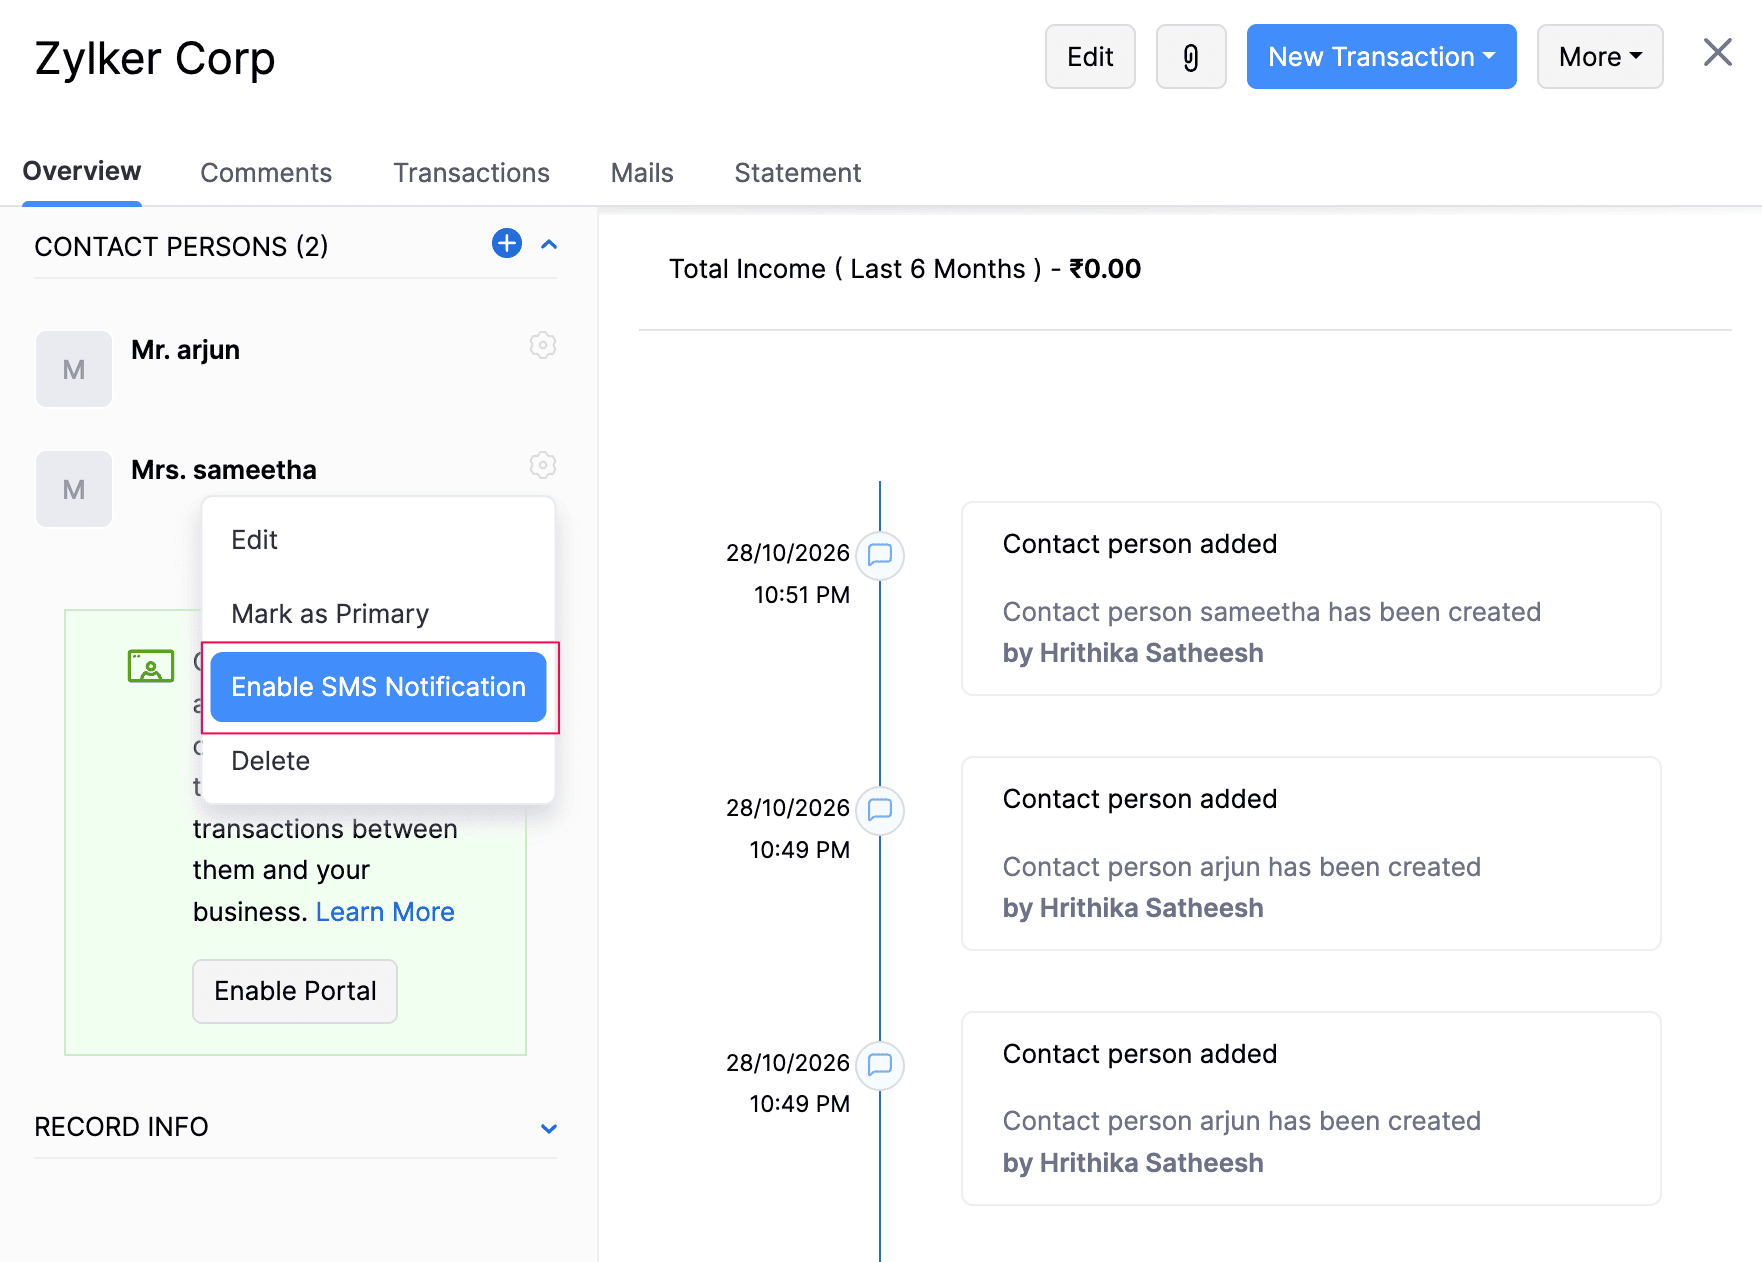
SMS notifications will be enabled for the contact person.
Enable SMS Notifications for Customers in Bulk
You can enable SMS notifications for customers in bulk in two ways:
All Primary Contacts and Contact Persons
To enable SMS notifications for all primary contacts and contact persons:
- Go to Settings.
- Select SMS Notifications under Customization.
- On the SMS Notifications page, click Update Communication Preference in the top right corner.
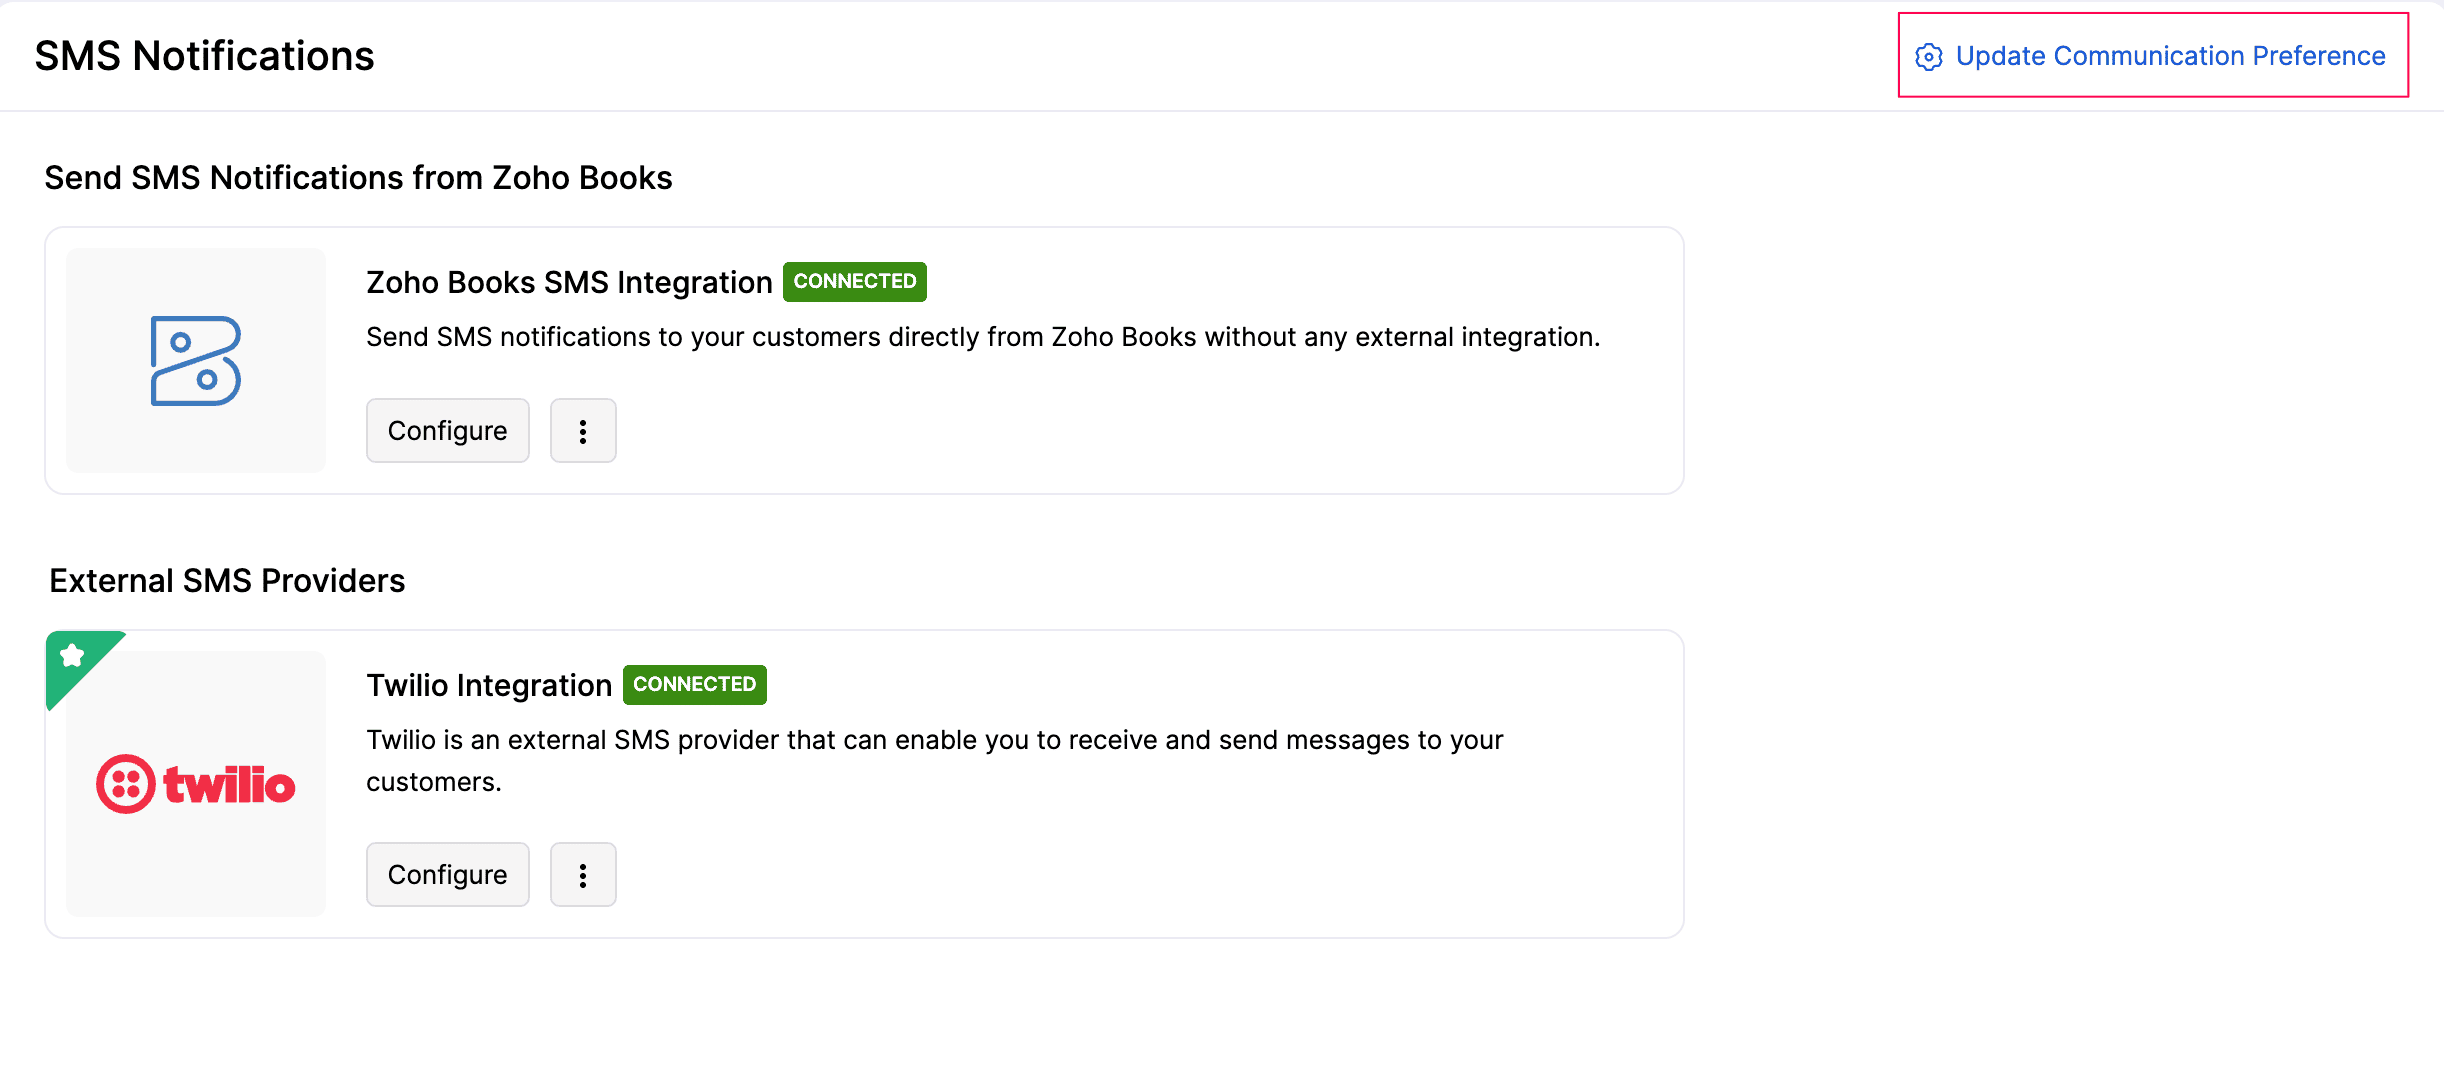
- In the Update Communication Preference pop-up, choose whether to send SMS notifications to primary contacts only, or to all primary contacts and contact persons.
- Click Save.
SMS notifications will be enabled for the selected contacts.
Specific Primary Contacts and Contact Persons
To enable SMS notifications for specific primary contacts and contact persons:
- Go to Sales on the left sidebar and select Customers.
- Select the customers whose primary contacts and contact persons you want to enable SMS notifications for.
- Click the More icon at the top and select Configure Communication Preferences from the dropdown.
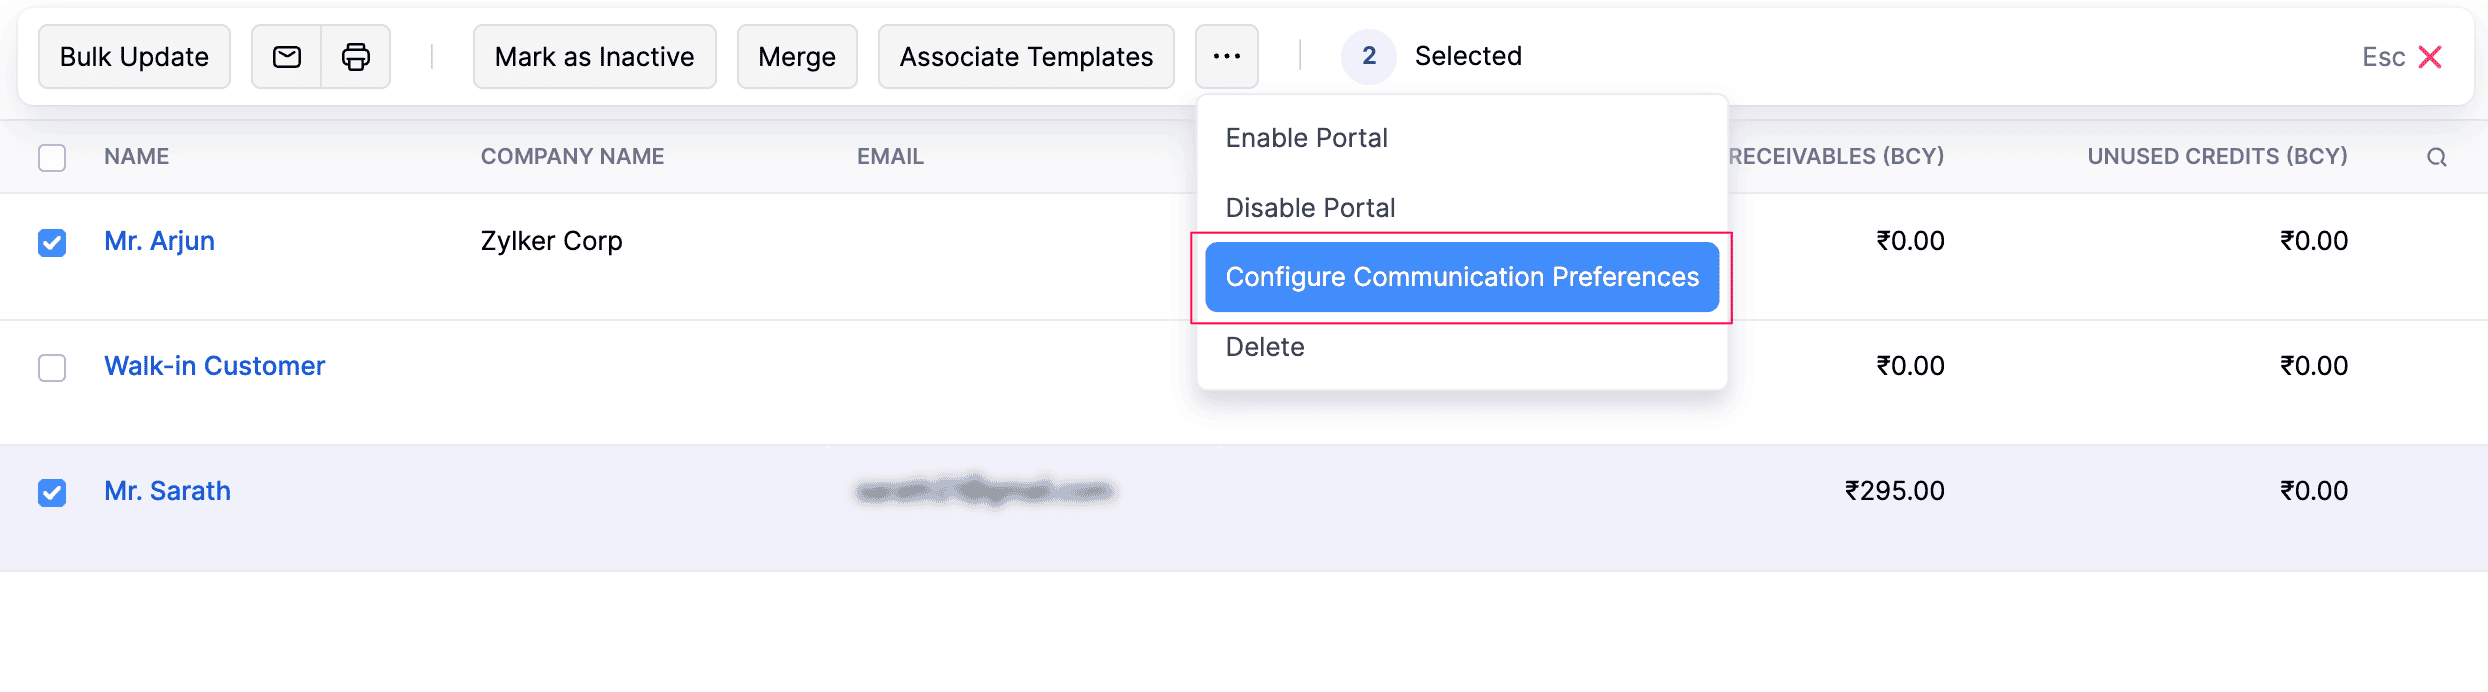
- In the Configure Communication Preferences pop-up, select a default recipient type from the dropdown for the SMS channel.
- Click Save.
SMS notifications will be enabled for the selected contacts.
Disable SMS Notifications
Disable SMS Notifications for Primary Contacts
To disable SMS notifications for a primary contact:
- Go to Sales on the left sidebar and select Customers.
- Select the customer for whom you want to disable SMS notifications.
- In the Overview tab, click the Gear icon next to the primary contact’s name and select Disable SMS Notification from the dropdown.
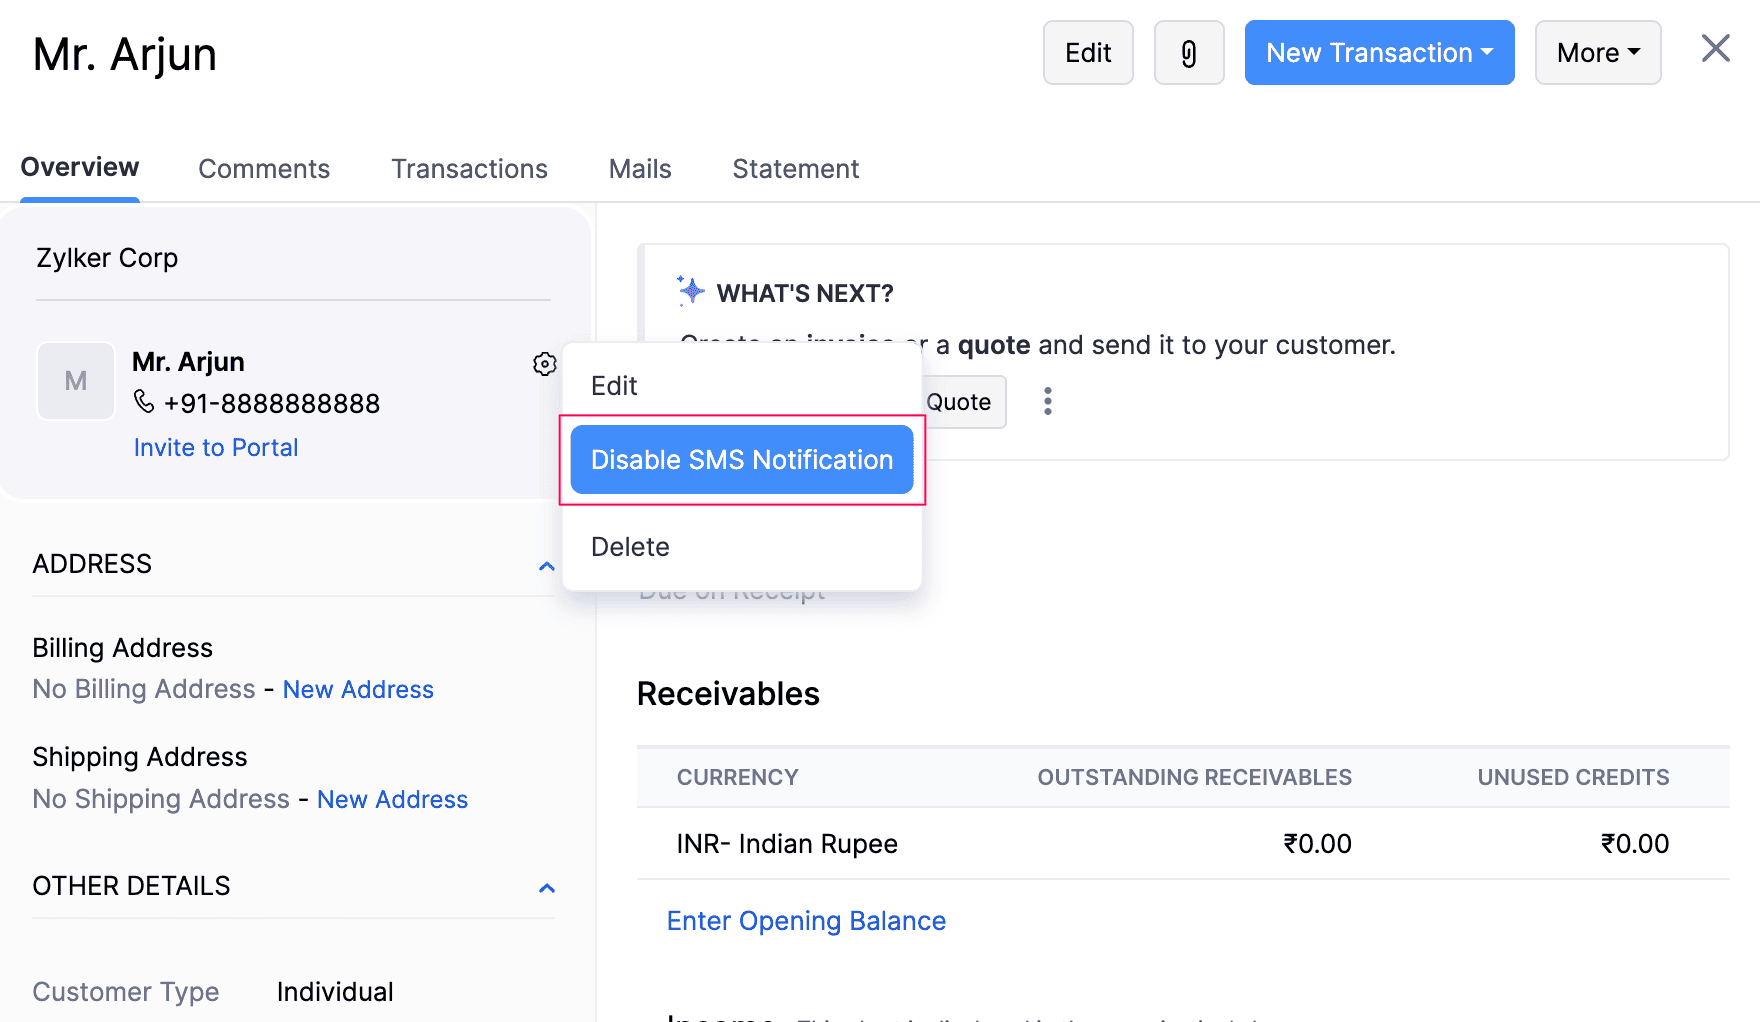
SMS notifications will be disabled for the primary contact.
Disable SMS Notifications for Contact Persons
To disable SMS notifications for a contact person:
- Go to Sales on the left sidebar and select Customers.
- Click the customer for whom you want to disable SMS notifications.
- Scroll down to the Contact Persons section and click the Gear icon next to the contact person.
- Select Disable SMS Notification from the dropdown.
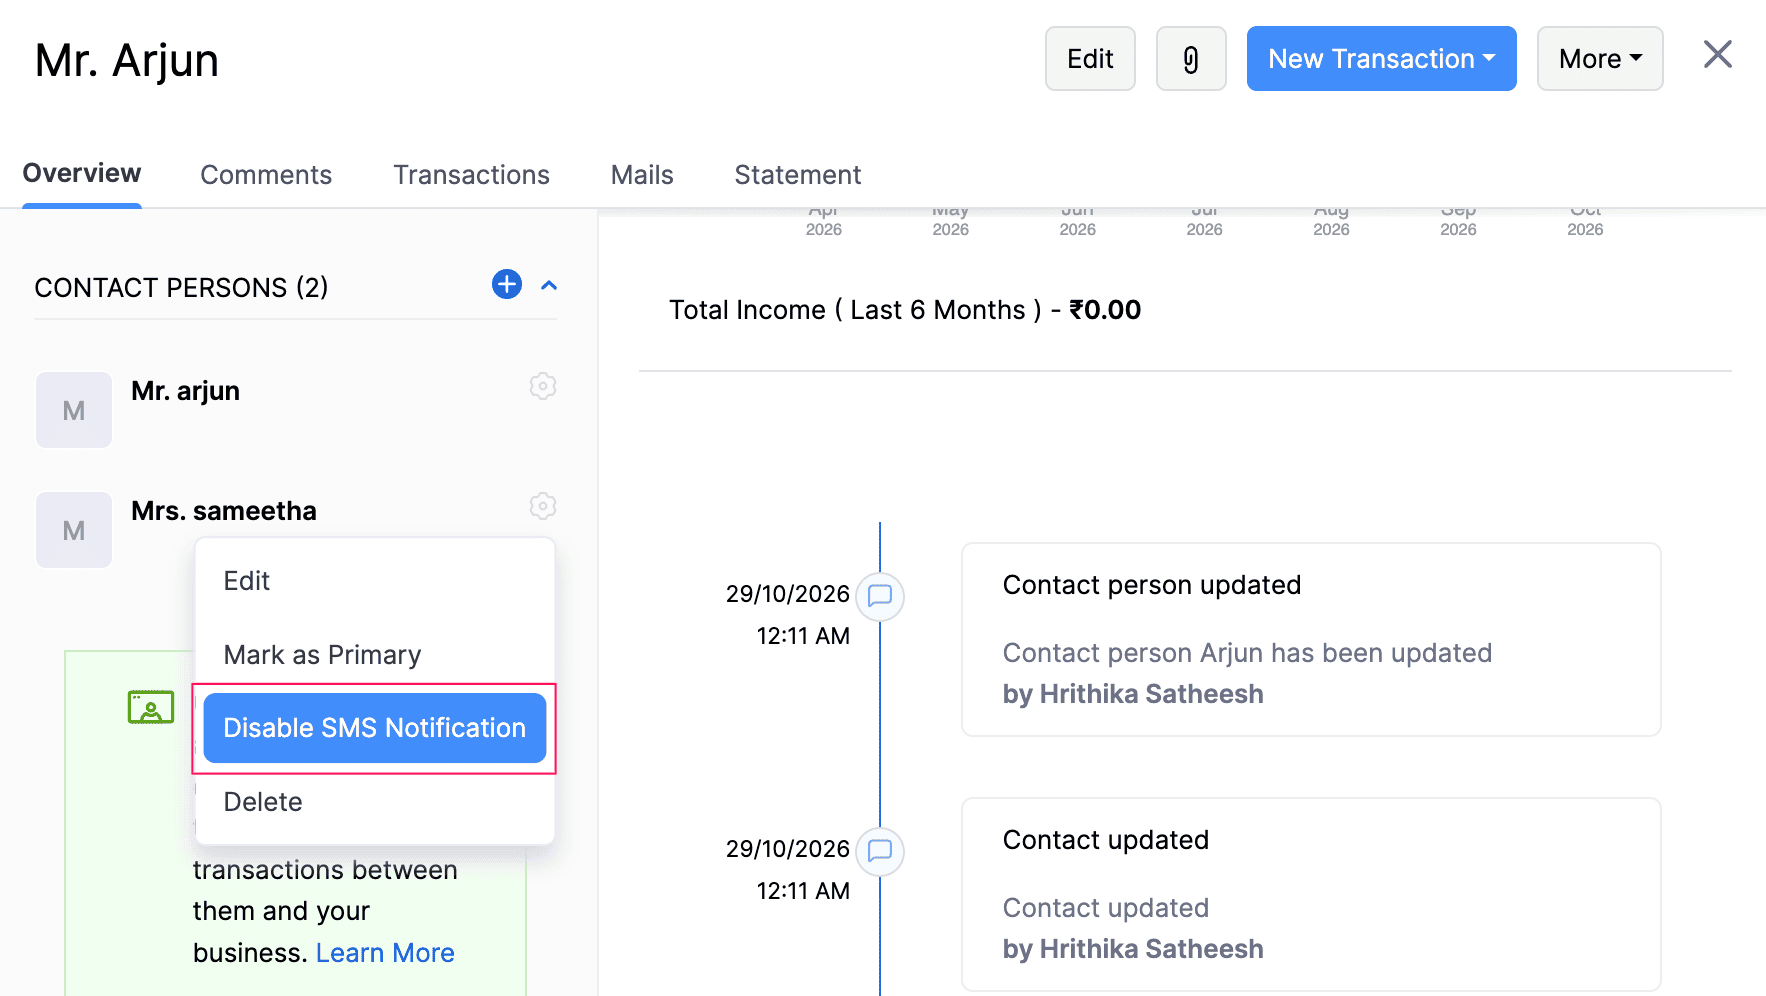
SMS notifications will be disabled for the contact person.
Disable SMS Notifications in Bulk
To disable SMS notifications for customers in bulk:
- Go to Sales on the left sidebar and select Customers.
- Select the customers for whom you want to disable SMS notifications.
- Click the More icon at the top and select Configure Communication Preferences from the dropdown.
- In the Default Recipients field for the SMS channel, select None.
- Click Save.
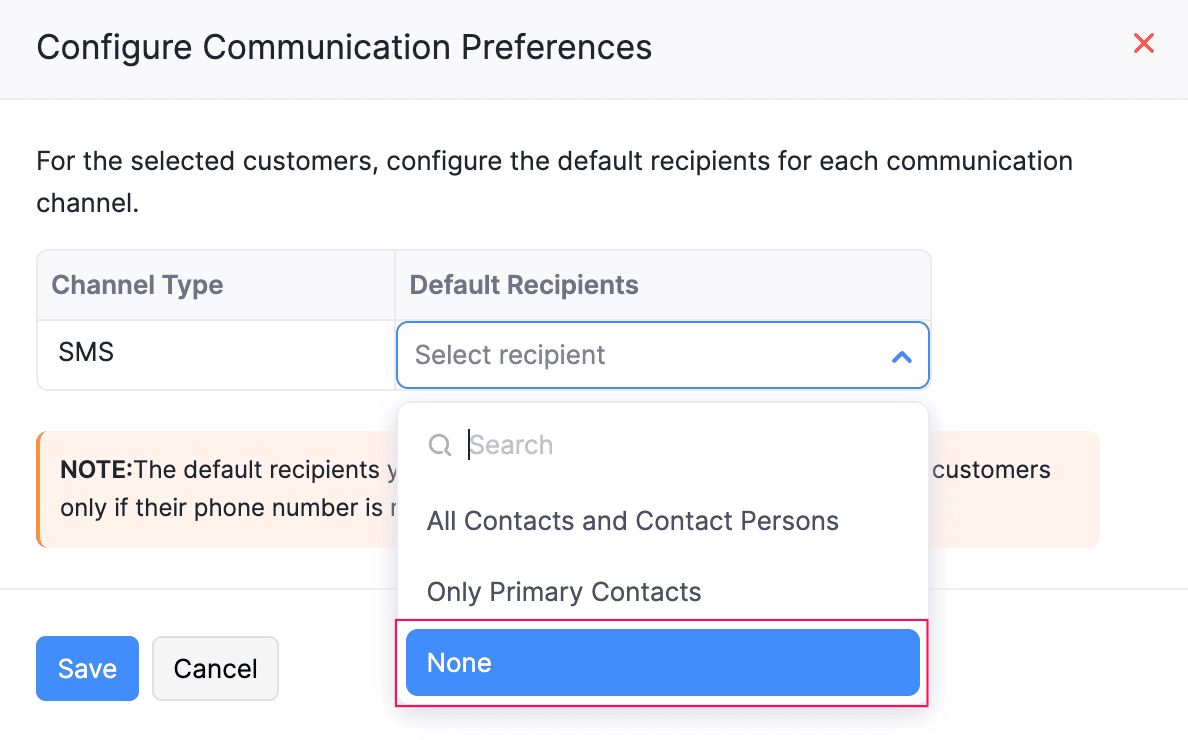
When the default recipients are set to None, SMS notifications will not be sent to any of the selected customers’ contacts.
Send SMS Notifications
Once you’ve set up your templates, you can send SMS notifications to your customers directly from your transactions. If you’ve set up multiple templates for a notification type, you can choose which one to use each time you send an SMS.
To send an SMS notification:
Go to a module (for example, Invoices) and select the transaction for which you want to send the SMS notification.
Click Send and select Send SMS from the dropdown.
In the Notify [Customer Name] via SMS pop-up:
SMS Type: This will be prefilled based on the transaction and cannot be changed.
Recipients: Select the contacts to whom you want to send the SMS notification.
SMS Template: Select the template you want to use. All templates you’ve set up for the selected SMS type will be listed here.
Review the message in the SMS Preview section.
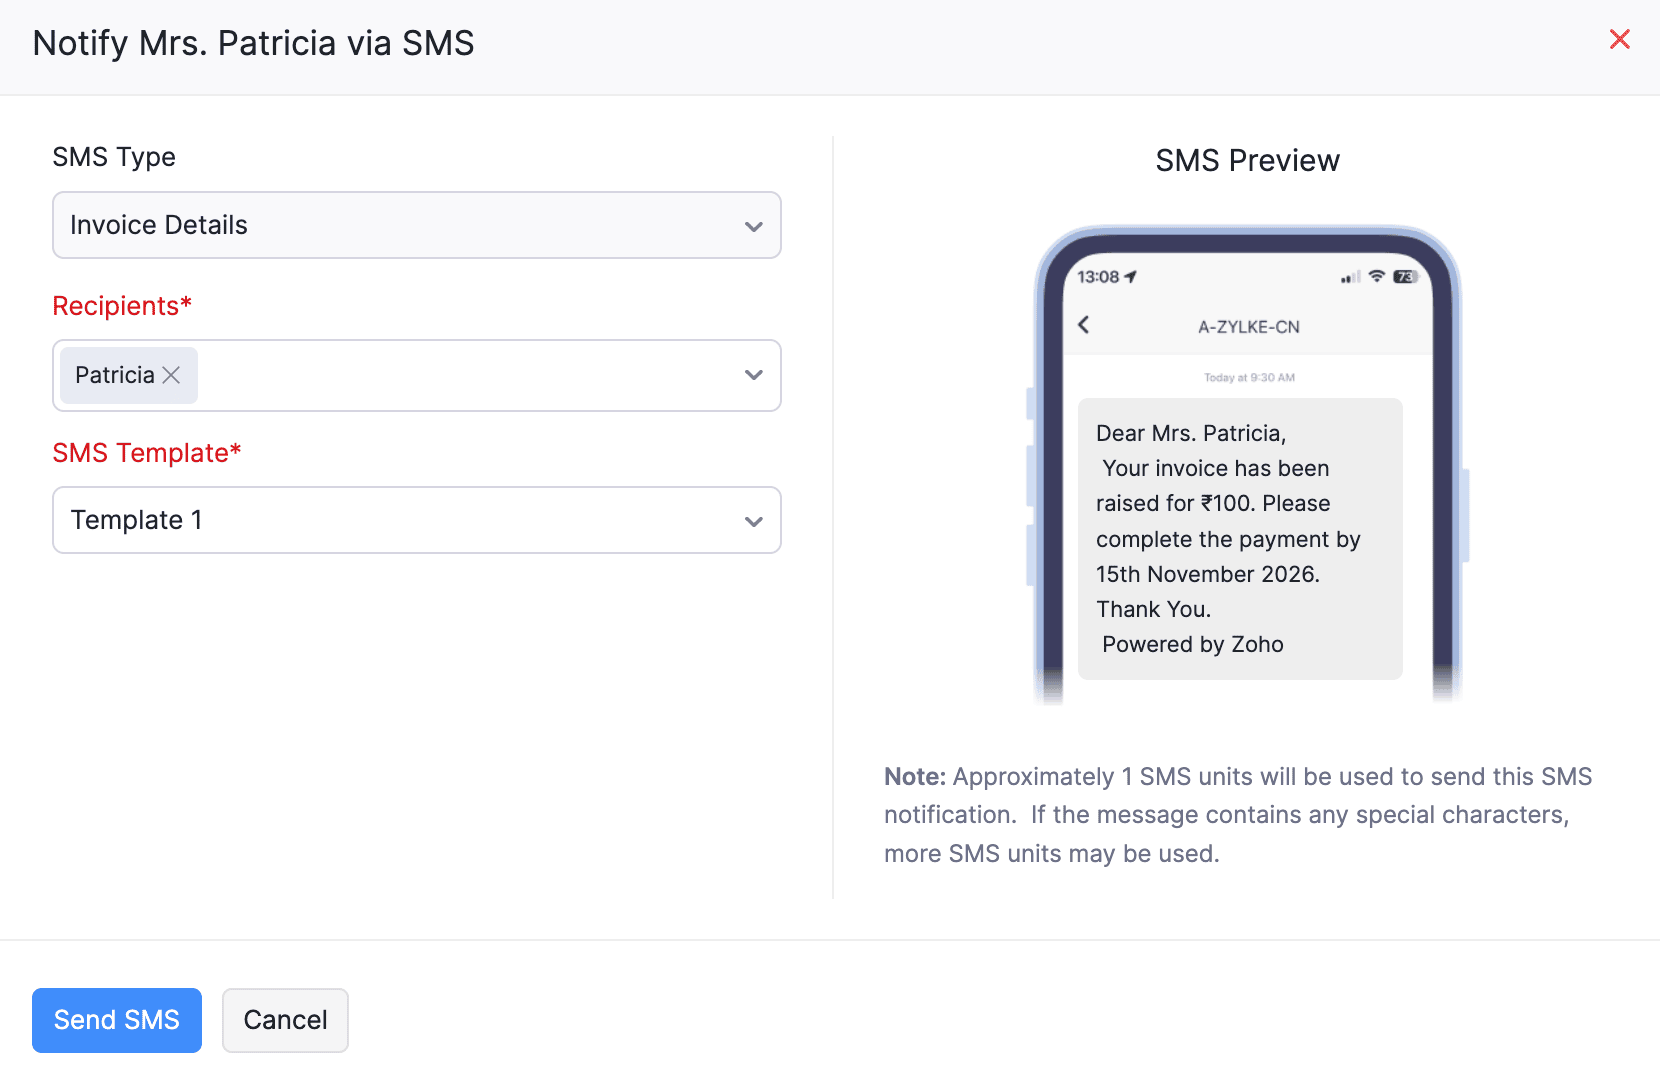
- Click Send SMS.
The SMS notification will be sent to the selected contacts using the template you’ve chosen.
View SMS Notifications Report
You can view a report of the SMS notifications sent from your organization.
To view the SMS notifications report:
- Go to Settings.
- Select SMS Notifications under Customization.
- On the SMS Notifications page, click the More icon next to Configure and select View SMS Notifications Report.
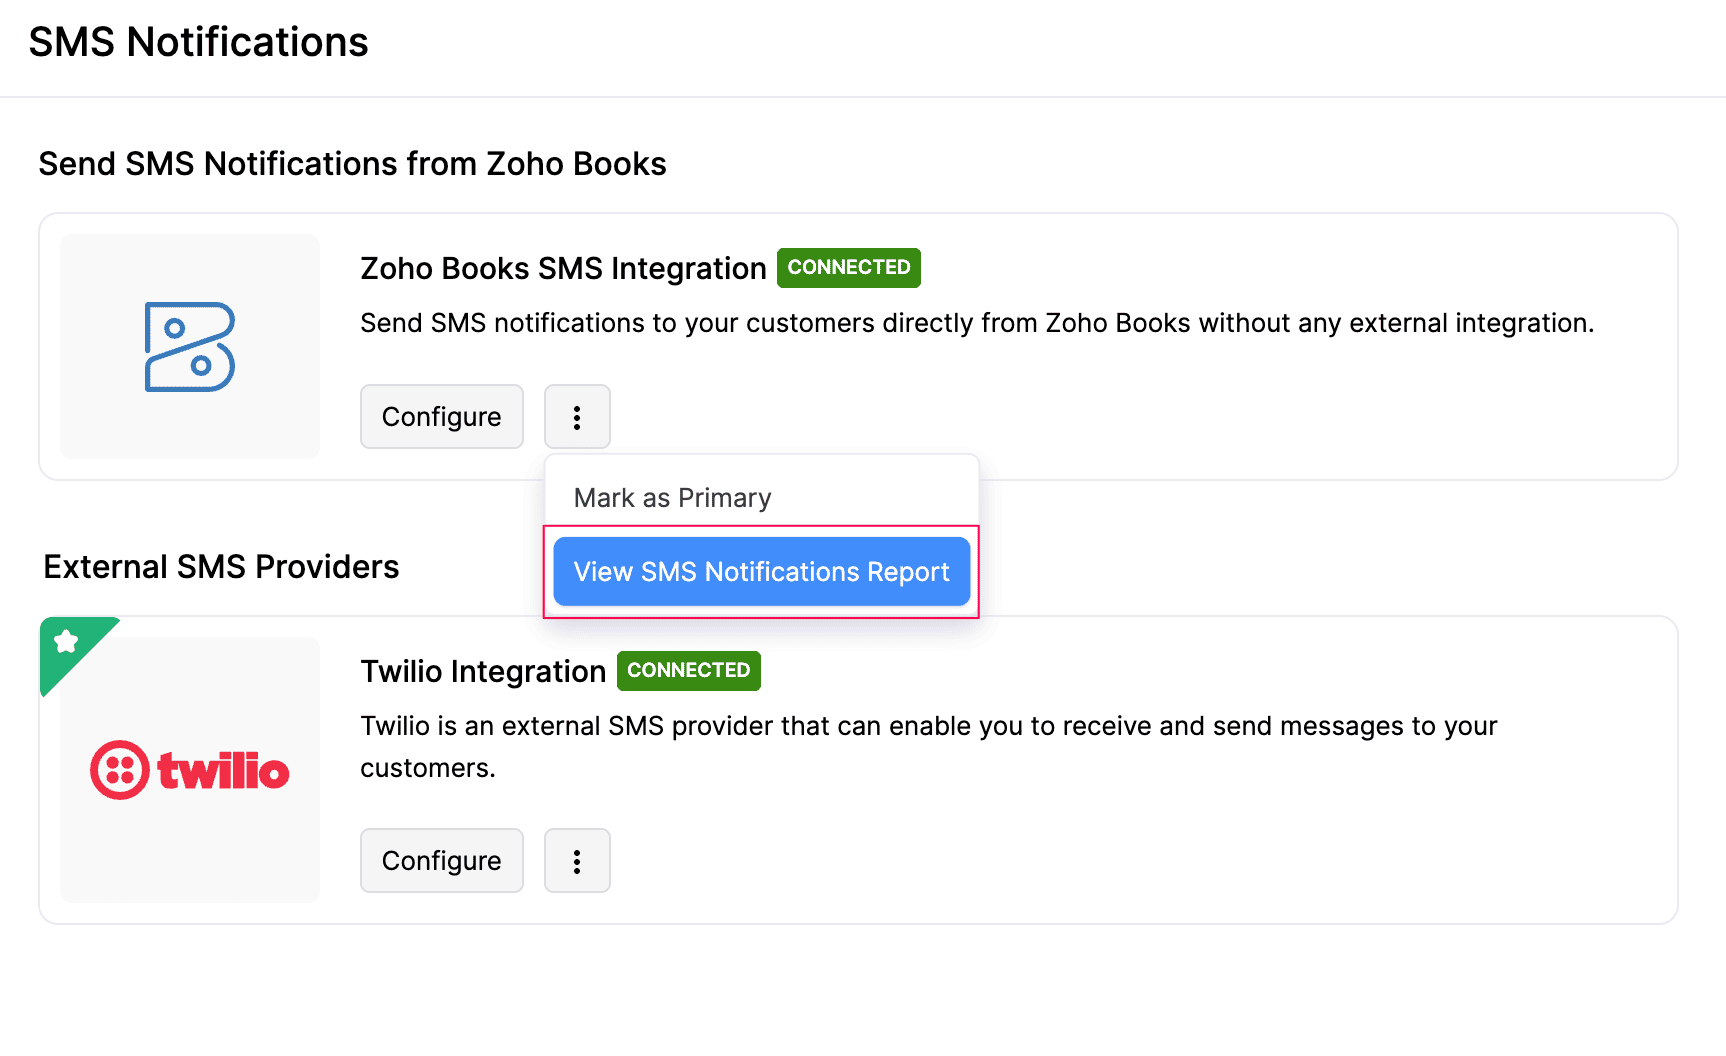
You will be able to see the details of the SMS notifications sent to your customers.
Disable SMS Notifications Integration
To disable SMS notifications integration:
- Go to Settings.
- Select SMS Notifications under the Customization section.
- On the SMS Notifications page, click Configure.
- In the Overview tab, click Manage Integration.
- Click Disable in the top-right corner of the page.
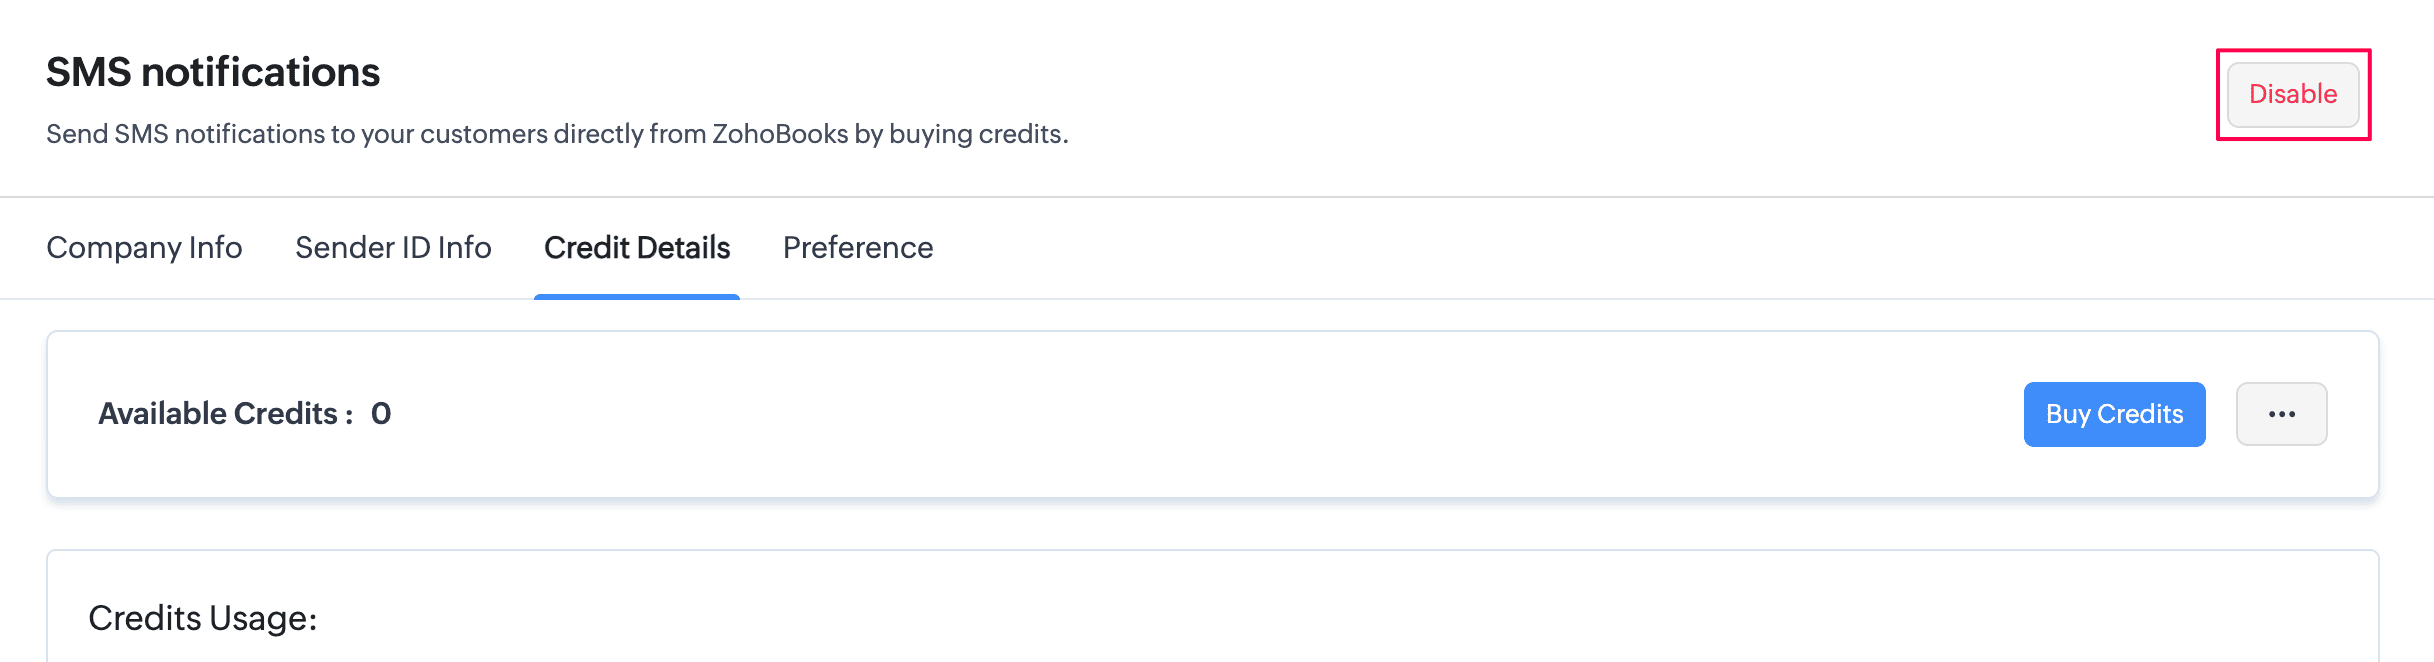
- In the pop-up, click Proceed.

Your SMS notifications integration will be disabled and all the templates linked to it will be deleted. Your remaining credits will stay available for use when you set up the integration again.
 Yes
